www.BadgerTrek.comAbout/ContactWeb LogOur Camper Van
Resources:Hobbies:MotorcyclesAmy's CakesOutboard Hydroplane RacingRadio Controlled Toys |
Lowering a Kawasaki Ninja 250 (EX250):

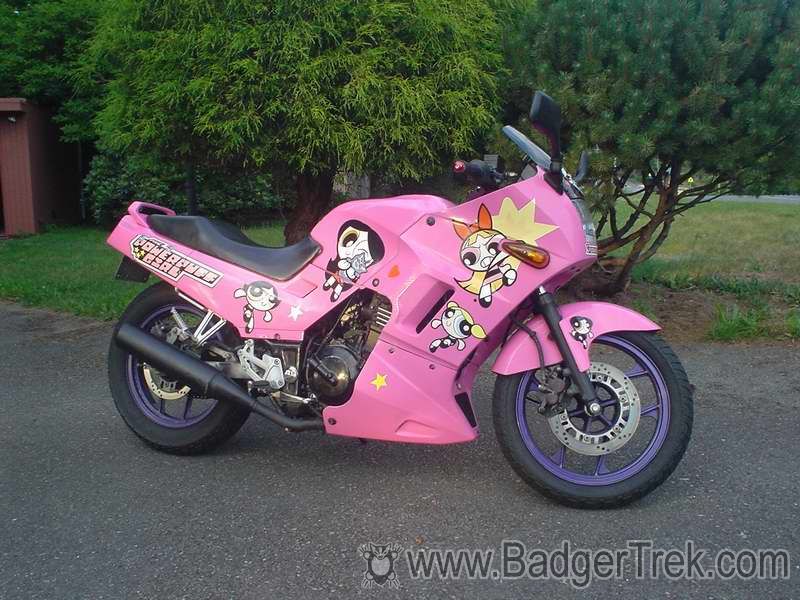
Periodically I get questions on how I lowered my wife's Ninja 250 (Kawasaki EX250 1995). She is efficiently sized, but this leaves her with only about a 22" inseam, with most sportbikes now available having seats over 30" above the ground.
I have cobbled together a few of my notes and put them below. I don't currently have any pictures of the steps, though I did take some and they are floating about somewhere. I will update as I come across them.
I lowered my wife's Ninja 250 about 2" front & rear. Cost was probably about 300$ for the parts, and a few hours of my work. I will try to summarize here (more pictures of the result here). We chose a Ninja 250 because it offers one of the lowest seats in stock form as a starting point.
Rear:
(work took about 2 hrs)
- Purchase lowering links (fixed 2" Vortex Lowering Link, or adjustable (but spendy) from AdjustmentTech)
- Remove center stand and toss (it will scrape the ground, and is too far to lift the bike when it is lowered)
- Install lowering links and lower bike according to instructions.
- Cut an inch or two off of the bottom of the kickstand (so the bike still leans). We used a hacksaw and cut just below the toe-loop so that the loop helps support the stand on loose ground
We used adjustable links as we didn't know how much lowering would be needed, and at the time they were one of the only manufacturers targeting the EX250. We ended up using the full extension, so a fixed 2" lowering link would have been much more economical. There are a number of manufacturers now, but Vortex has a reasonably good reputation.
Front:
(work took about 3 hrs, mainly on adjusting the controls and fiddling with the turning stops)
- Remove handle-bars. Remove controls from bars.
- Buy 36mm Clip-ons
- loosen forks in triple clamps (do 1 side at a time so the whole bike doesn't drop to the fender) and raise up the fork leg an inch or two.
- Install clip-ons on the part of the fork that protrudes above the top triple clamp.
- Put controls on clip-ons (On Amy's bike, with the clip-ons I bought, this required removing the brake-light switch and replacing with a 10x1.25 Brake Line Pressure Banjo Bolt
, and removing the clutch safety switch (which means it can be started in-gear with the clutch out now)).
- Check for turning clearance. The control pods could now hit the tank at full turn before the turning locks were hit. I drilled a hole in each turning lock, tapped it, and put in a screw so that I could adjust the stops so that the tank would not be hit. Note that this does reduce turning radius a fair bit. I have noticed that the control pods are a bit different on newer models, and this may not be an issue. Longer clip-ons would also alleviate this problem.
Another option here is to keep the stock handle bars and just put in a set of spacers which raise the bars. We chose not to go this route as this would put the bars fairly high
Front suspension:
(optional, took about 1 hr.)
Now that the front was lowered the ultra-soft front springs became a significant issue, with the fender hitting the fairing at the slightest bump, even with just Amy's weight as a rider.
The solution is to replace a part of the spring with a non-compressible pipe. This effectively increases the overall spring rate in the fork.
- removed one fork cap (push down on the center with a dowel, and pop out the retaining clip, a friend can help).
- Pull out the spring, cut about 4"-6" off of it with a hack-saw
- The end of the spring is now not flat, and will likely bind in the fork tube, so this needs to be fixed. Heat the cut end of the spring red hot with a torch and flatten it against something non flammable (concrete), then quench it in water (just heat the last coil on the spring if possible).
- Cut a piece of thick-walled (solid core schedule 80 in the states) PVC pipe of the length that the spring was shortened (remember to account for the height lost when flattening the last coil). The pipe should be the same outside diameter as the spring.
- Put spring back in fork, then insert the pipe piece, then put the cap back in and the retaining clip.
- repeat for other fork leg
Notes:
The only problem we have had is that ground clearance in corners is severely reduced if you are heavier and ride fast (not a problem for my wife, but an issue for me as I weigh 50lb more).
Many of the folks asking for this information are new riders, or helping out new riders. If this is the case for you I STRONGLY suggest contacting a local rider training group, and reading a book covering how to ride safely on the street in traffic such as the excellent Proficient Motorcycling.