www.BadgerTrek.comAbout/ContactWeb LogOur Camper Van
Resources:Hobbies:MotorcyclesAmy's CakesOutboard Hydroplane RacingRadio Controlled Toys |
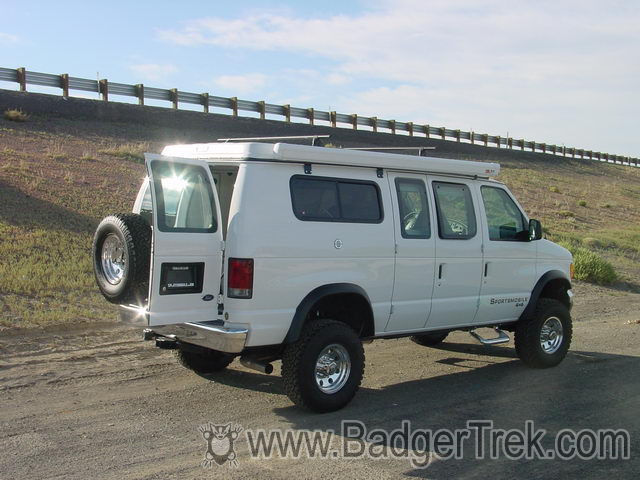
Sportsmobile Base Ford E350 Diesel
How it came:
The Sportsmobile is built on a 2005 Ford E350 Powerstroke 6.0L V8 Diesel van chassis.
After a number of visits to a couple Ford dealers to address issues we have had with the van itself (engine noises, brakes, etc) under warranty, I am certain that we will NEVER again purchase a Ford vehicle. The dealers have all had an immediate attitude of all of the warranty being void because of the lift and 4x4 conversion. In each case the van has been held for many days, and upon its return none of the significant issues have been fixed, and more things have been out-of-place and not reassembled properly.
Issues:
- Stuck Valve - When we were heading down to Fresno, CA to pick up the van from Sportsmobile, we were told that after the 4x4 conversion they did a test drive and heard a strange noise. They took the van back to Ford and the problem was determined to be a stuck valve, necessitating the engine being pulled and a new head put on. This took a number of days, and resulted in Sportsmobile getting the van back on the day we were scheduled to pick it up. The conversion was not finished yet, and we ended up spending an extra day in lovely Fresno, CA while the work was rushed to completion.
- Dented oil-pan, bent radiator fins, no horn - Likely in the rush to complete the repair of the stuck valve a number of things were dinged up on the van before we even obtained it. The oil pan has a fair sized depression from some sort of impact, the various radiators at the front all had bent fins (radiator, AC condenser, etc), and the horn was not plugged into the wiring harness.
- Cabin Noise - The van cabin is a very noisy place when driving because the engine and transmission is right between the driver's & passenger's seat. An access cover is in the cabin between the seats, clamped over the engine and transmission called the "dog-house". Much of the engine noise seems to come through here, and the cover gets quite hot after driving for a while since it is immediately over the turbo-charger and exhaust pipes.
- Resonant Noise - Around 4000 miles we started to notice a resonant noise that came on about 1400rpm and tailed off around 1900rpm. It only happened when the van was warm, and became louder and louder over the year. Other friends we met with Sportsmobiles of similar vintage who rode in our van all commented on the noise, confirming that it was not our imagination, nor was it normal. Two dealer techs have also confirmed the noise to exist and not be expected.
- Steering Noise - As time went on we began to notice a hissing noise from the steering column that would go away when pressure was applied to turn the vehicle, but come back when we were tracking nearly straight. It was fairly quiet, but getting louder and rather irritating.
- After taking the van in to a dealer to have the noises looked into, they swapped out the power-steering pump. No noises disappeared, but a new growl now sounds when driving at slow speeds (e.g. through town) that vibrates the floorboards and steering column.
- A visit to a second dealer to deal with the noises resulted in them first blaming aftermarket AC (we have none), then aftermarket wiring in the engine compartment (again none), and finally replacing the high-pressure-oil-pump. They returned the van with supreme confidence that the problems were resolved and the noise reoccurred within 20 minutes of our receipt of it.
- Broken engine mount bolt - At one point we noticed that one of the engine mount bolts was broken. We took it to a dealer where they first said it was replaced. When I pointed out (upon pickup) that it was still broken they took the van back, and after breaking a drill bit in the remaining part of the bolt, decided it was not warrantyable since they had never seen a broken one before, and thus we must have done something violent with the van. They then quoted 6 hours labor to remove it, so we refused. I took all of 30 minutes to remove the broken bolt myself, replace it with a new one, and discovered that almost all the other bolts on the same motor mount were loose too, and tightened them (the looseness explaining why the bolt had broken in the first place). The root cause is most likely a failure to torque down the engine-mount bolts when our engine was pulled and replaced for the stuck valve.
- Heat through "dog-house" - Since the dog-house (in-cab engine cover) is right over the turbo-charger and exhaust pipes it is exposed to a lot of heat. On the cabin side of the dog-house are cup-holders and a place to stow small gear (in replacement of a normal-car's glove box). Any drinks put in the cup-holders becomes quite warm after a few minutes, and items put into the box have to be able to withstand a fair bit of heat (e.g. alcohol based hand sanitizer bubbles right out of the bottle).
- Tape deck stereo - The van came with an old stereo tape deck. Although others who purchased 2005 vans ended up with CD players, we ended up with an archaic tape system. And no auxiliary input for our computer or iPod.
- Paper cone speakers - The speakers for the stereo system were standard cheap paper 6x9" cones. These would likely not live very long in the humid environment a camper van can become in inclement weather with the doors and windows closed and two people breathing and eating. Plus we do like reasonably good audio reproduction.
- Brakes were a bit on the weak side when descending steps off road with our larger tires.
- The transmission cooler for the van is 1/5 of the size of the cooler for the equivalent Ford pickup trucks running the same engine and transmission. The cooler was also located right behind the large Ford emblem on the grill, and transmission temperatures would climb very quickly under any load.
- General engine updates to address reliability concerns. Ford does not supply these under warranty unless it breaks, so known issues like the breaking the the high-pressure-oil-pump STC fitting must occur before it will be replaced under warranty, which left us stranded once, and then I begain replacing parts myself. Items included: updated oil cooler, updated fuel-pressure regulator spring, updated HP-oil stand pipes, updated HP-oil dummy plugs, updated turbo oil feed, updated turbo oil drain, new turbo-charger due to internal rust, etc.
What we added/changed:
Resonant Droan/Moan Noise:
After a year of listening to the resonant noise from the engine we decided to take the van in to a Ford dealer while we were in Seattle staying with Amy's parents. This gave us a car to borrow and a bed to sleep in if the van needed to stay overnight. I took the tech on a test drive and pointed out the resonant engine noise, the hissing sound from the steering column, and he confirmed that he heard them as well, and they were not normal sounds. I also pointed out a small oil leak from somewhere between the engine and transmission that doesn't drip, but does get the oil-pan and transmission quite dirty over time.
After 3 days of holding the van, the Ford dealer said that the noises we had reported were fixed, and a couple recalls were done as well. The headers had been re-torqued for the resonant exhaust noise, and the hissing was due to a faulty steering pump which had been replaced. The oil leak source was not located but they gave me some dye to put in a few hundred miles before returning so they could find the source. On the drive home I found that the steering noise was slightly diminished, but the resonant noise returned once the engine heated up within 3 miles of the shop, and a new growl now accompanied it at lower RPM.
As the noise was terribly bothersome, and with our larger tires we were at the affected RPM more often I decided to figure the problem out myself. That evening I dismantled the exhaust system from the headers to the muffler and found that one of the mounting bolts for the turbo-charger was missing. It was only held in place with two bolts. There was also one bolt holding a junction pipe from the header to the turbo that was cross-threaded and thus not torqued down squarely. I replaced the two bolts with new ones, reassembled the exhaust system, and a test drive confirmed that the noise was completely gone.
On our trip from the North-West down to California we found that the noise was not actually completely gone, but would show up about 2 or 3 hours into each day's drive. The noise is at a different frequency again, and will come and go in intensity after it starts, but the silence in the first few hours is quite welcome.
A visit to another Ford dealer had them spend a week to replace the High-Pressure Oil Pump (which sits right under the turbo), and when that did not fix anything they blamed aftermarket air-conditioning and wire bundles in the engine compartment (neither of which we had). Finally they just told us to take the van back since they did not want to work on it anymore (this was the same shop that would not replace the broken engine mount bolt under warranty).
The final resolution (which I found myself) turned out to be one of the transmission cooler lines, resting on the front frame cross-member, transferring noise into the cabin because it was not clipped into the appropriate plastic holders along its run. This probably occurred when our engine was pulled before we picked it up. Upon re-clipping the line, the noise was gone.
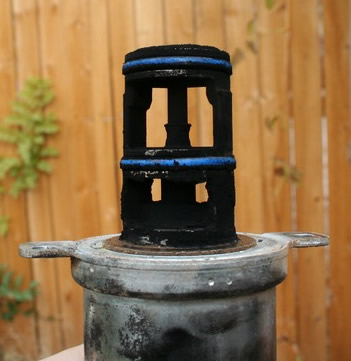
Doghouse Insulation:
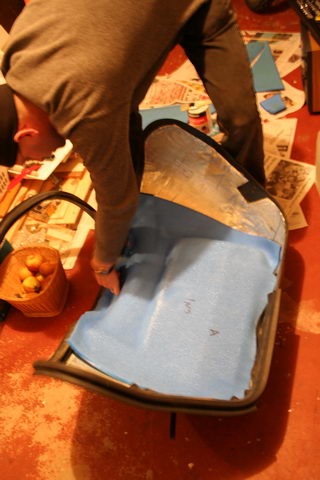
Because of the noise and heat that transmitted through the dog-house we decided to see what we could do to insulate it when we had a few days of down-time where we could stay in a house and work on the van. We removed the dog-house, pulled off the rubber gasket, drilled out the 4 rivets that hold the stock aluminum covered fiberglass blanket insulation, and gained access to the inside of the plastic form of the dog-house itself. For the main insulation we chose 1/2" closed-cell sleeping pad since it was readily available, light, and had worked well on our floor. Some contact cement held that in place quite well. We then covered all of the inside of the doghouse with self-adhesive aluminum-covered foam intended for furnace ducting. All of the seams we taped with aluminum ducting tape. The purpose of this was to add a bit more insulation, a reflective barrier to the noise, and to protect the sleeping mat foam from hot-spots. After this was all in place we put the stock fiberglass/aluminum insulation back on top of the other layers, and re-riveted it all together. The result, when put back in the van, was a significant reduction in higher-frequency engine noise, and much less heat transfer into the cabin through the dog-house. We can now keep a cool soda in the cup-holders and expect it to stay cool for more than 10 minutes. |
 |
Exhaust Insulation:
After a few years of use we found that although the dog-house insulation mentioned above had helped, any more we could do to reduce heat in the cabin would be helpful. Some research led us to consider wrapping the up-pipes, turbo, and down-pipe with exhaust insulation. There are conflicting reports on the internet as to the functionality and potential damage this can cause to the exhaust components, however we found the noted cautions to quite often be reports from "friend of a friend", not applicable to our system (stainless pipes, turbo, etc), or tolerable risk from our perspective.
The benefits we hope for are:
- Reduced in cab heat (keep heat in the exhaust pipes)
- Reduced under-hood heat affecting fuel lines (we installed a rear-crossover fuel line at this time, which necessarily runs near the up-pipes), electronics, etc
- Reduced noise in the cabin due to damping and noise-insulation from the wrap
I first painted the up-pipes and down-pipe with silicone resin spray to reduce oxygen exposure, and thus corrosion, as the pipe metal will be getting somewhat hotter under the insulation. I then covered the pipes with some braided basalt I had floating around from another project (doesn't everyone?) as it can handle much higher temperatures than fiberglass, and wrapped the assembly with wet commercial exhaust wrap. After all that dried out I painted the wrapped pipes with the silicone resin again to keep out water, oil, fuel, dirt, or other contaminants that could reduce effectiveness of the wrap and contribute to corrosion.
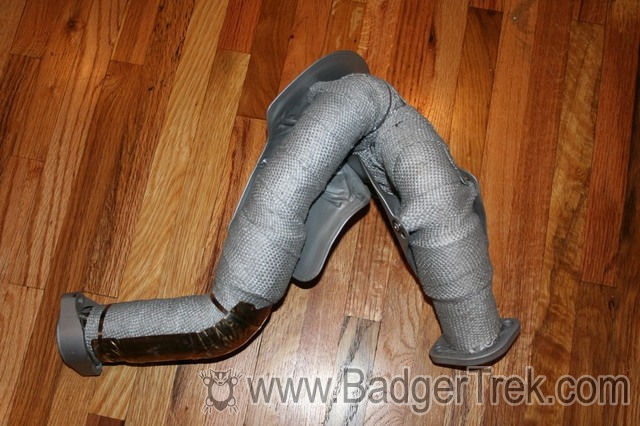
The turbocharger was simply covered with a "turbo-blanket" that I obtained from an outfit on eBay. It was not as large as I hoped, and only covered the top 2/3 of the turbo housing, but should be better than nothing, and proved a lot more heat shielding than the small heat-shield plate on top of the turbo from the factory.
Benefits are currently unknown. It definitely has some effect as I can now place my hand on engine parts near the exhaust (with the dog-house off) that I could not touch before due to heat.
Heater Core Valve:
One of the big issues we noticed in the summer was heat coming from the dash vents, even with the dial at full "cold". This was especially pronounced after the van had been off for a short while, and we started up again, or if we were driving slowly on rough roads.
A bit of digging revealed the answer: the heater core always has coolant flowing through it, regardless of the position of the temperature select dial. All the dial does is direct the airflow through or around the heater core, but the heat is still pumping into the airbox. Ford did offer a valve that would turn off the coolant-flow through the heater-core on "Max A/C" for some of the trucks, but we did not have that option, and there were certainly times we would like to just have the vent open without heat coming in.
In 2009 we purchased a vacuum controlled coolant flow valve and vacuum solenoid from DieselSite.com to address this issue. When removing all the heater hoses plumbed into the heater-core for the coolant-pre-heater we installed this valve and associated electronics.
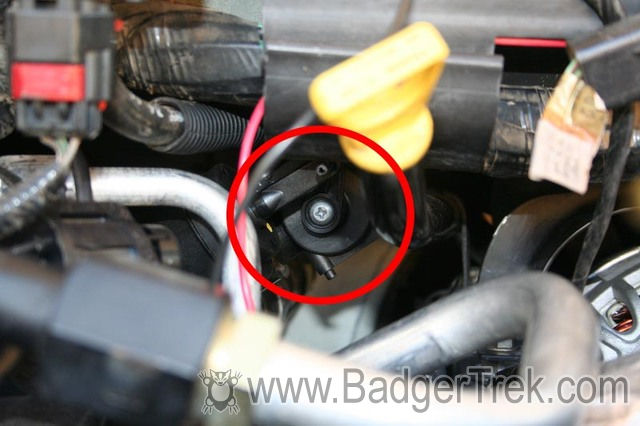
The valve is actuated by a switch on the dash that effectively turns the heater-core on or off. We can now turn all heat off in the cab if we so wish, and the benefit is quite significant, making the output of the vent and AC modes quite a bit cooler than before when off.
Stereo:
For the stereo we knew we wanted something that had a couple of auxiliary inputs. We had both the main computer in the back of the van where we would sit to watch movies, and the laptop up front that could play MP3s or give driving directions. A remote would also be nice since we would spend much of our time in the living area where getting to the dash might be a hassle. Finally, since much of our music collection is in the form of MP3s, a stereo that could play MP3s from a CD or DVD would be ideal so we would not need to devote a computer to that task just to listen to music.
We ended up selecting a Blaupunkt model that was in closeout, had 2 auxiliary audio inputs, a remote control (good for adjusting volume and such from the living area), and the ability to play MP3s from a burned CD.
It works reasonably well, though it has trouble with some MP3s which will cause it to lock-up requiring the CD to be ejected, the radio power-cycled, and then we need to avoid that MP3 in the future.
Alternator:
As we be gain re-working the van in 2009, one of the issues of concern was the stock alternator. The van came with a 110Amp alternator from the factory, and the idea of increasing the output with a larger capacity unit was appealing. Some of the reasons included:
- Faster recharge at idle when parked (winter weeks with no sun on the panels)
- Keep up with draw from heavier-duty items like our new air-compressor (it would pull the stock charging system below 13v even when the engine was running at high-idle)
- Larger case to generate less heat when charging
The van uses a 6G Ford format mounting system in a "small-case". Some peering into the engine compartment convinced me that there was clearance for a 6G "large-case" alternator which would allow a physically bigger unit.
We found a 200Amp unit, with a heavy-duty rectifier, from a reputable alternator dealer for a few hundred dollars. The weight of the new alternator was about 50% more than the stock unit, and that bulk should help. The pulley was about 15% smaller in diameter so the charge would come up quicker at lower RPM which was also a benefit to us when charging at idle or high-idle.
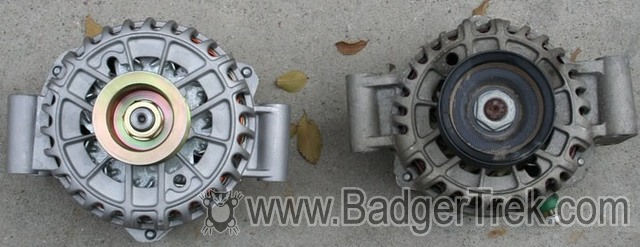
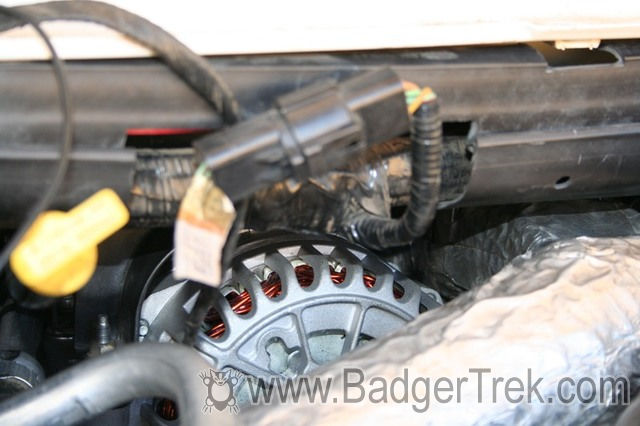
The install was performed while doing a bunch of other work, but in the end the new alternator dropped right in with just a reaming out of the output cable lug for the larger output stud. A few quick tests showed it performing as desired, holding the charging system above 13.8v with the engine at high-idle, the new air-compressor running, and about 5 amps still being fed into the house-battery bank.
Coolant Filter:
When we finally returned home after being stranded for a few days due to engine failure, we determined to investigate all known reliability issues with the 6.0L Powerstroke and address them as best we could before we had another unpleasant experience.
One of the items that showed up quickly in our research was EGR (Exhaust Gas Return) failure due to insufficient coolant flow, often blamed on plugging of the oil-cooler by casting-sand and rust scale. A simple solution to this problem used on many larger diesel engines is a coolant bypass filter. They are cheap, and we found one that looked easily adaptable to our van at DieselSite.com.
As with most aftermarket kits for the Powerstroke, it was targeted at the pickup trucks, but all the necessary parts were there.
We mounted the filter under the van on the plate opposite the fuel-filter, with the input to the filter coming from the coolant line out of the block drain-plugs we were putting in at the same time for the Hydronic coolant-heater. We chose this location as it was physically the lowest part of the cooling system (for grit to settle out easier), and kept more clutter out of the already packed engine bay. The return line from the filter also only needed to follow the frame rail a short way before heading up and Ting into the EGR degas tube for return to the system at the degas bottle.
Gauges:
Another issue that came to mind when we became stranded by the inoperable engine was a way to read engine computer codes, and also a set of gauges to monitor the engine and transmission state.
With some reading we decided to go with the Edge Insight
digital gauge package. For our use it could tap into the diagnostics port and read most of the data we cared about directly from the onboard Ford system sensors. The only sensor not provided by Ford an exhaust gas temperature reading, and Edge offered a thermocouple EGT probe
for this purpose.
The probe installed into the driver's side exhaust header just before the up-pipe. Other than having to lay on the ground to drill and tap this hole installation was easy. The output wire I routed through a hole I drilled in the firewall next to the wire-harness plugs and sealed with a grommet and some silicone rubber.
The gauge is digital with customizable display selection of the parameters we care about. For initial usage we chose exhaust, coolant, oil, and transmission temperature, along with fuel level.
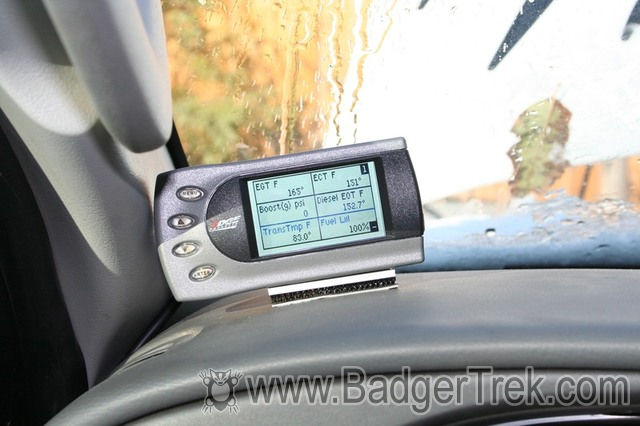
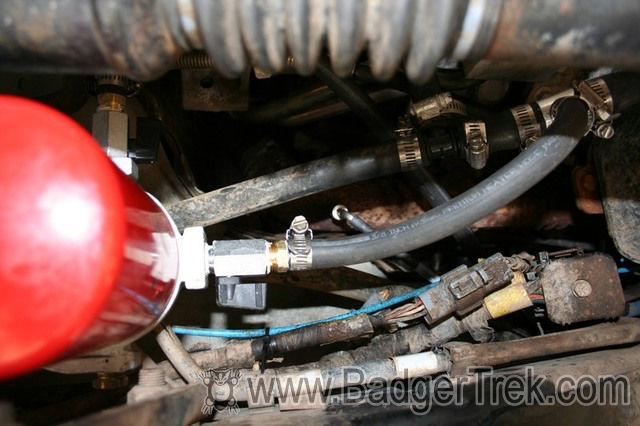
Fuel Pressure, unfortunately, is not accounted for in the Edge Insight, at least the older version we have. The engine does not have a fuel pressure sensor, and no accounting is made for adding an additional input to the Insight beyond the EGT probe. As the years have passed, however, it has become apparent that a lot of the Powerstroke 6.0 engines have injector problems due to low fuel pressure. Ford/International have released an updated stronger fuel pressure regulator spring, that significantly increases the fuel-rail pressure, but real-time monitoring is advised. There is a pressure tap port on the secondary fuel filter housing, and the truck folks have adapters to fit in allowing the connection of fuel-pressure senders, however after trying one of these I found it will not fit in the van which has a different wiring harness routing.
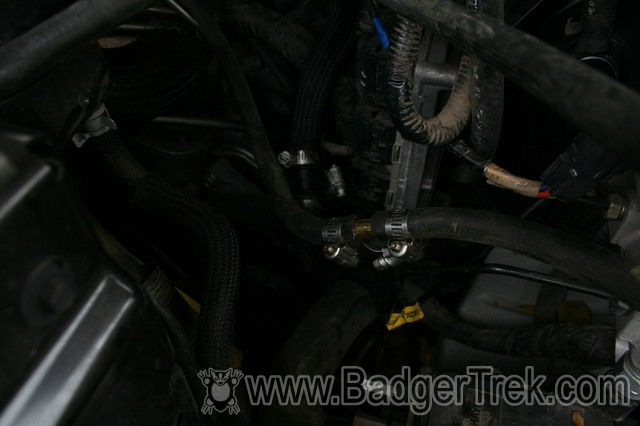
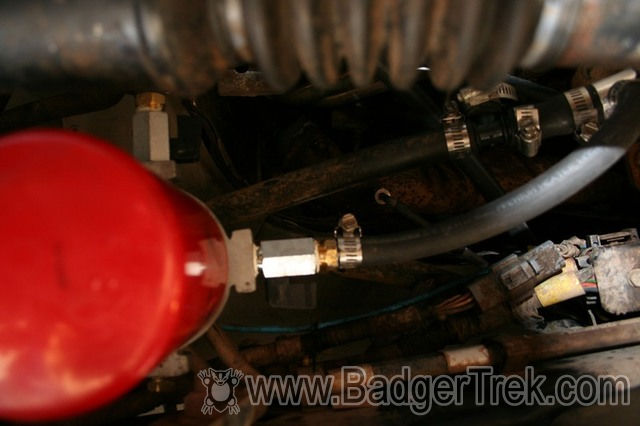
I had already put a fuel-crossover line on the rear of the cylinder heads to allow fuel to flow between the left and right fuel-pressure rail, and this was constructed with AN fittings, so after a flash of insight, I simply added an AN fuel pressure tee fitting for 10$ and was able to put a fuel pressure sender on easily. Additionally, sensing the fuel pressure at the back of the heads is arguably more useful a piece of data than the pressure at the filter, since this rear location will account for pressure losses across all of the injectors.
With the updated Ford fuel-pressure spring ('blue spring') I found the pressure at idle at the back of heads to be about 72psi. I did not have the pressure gauge in place before this change, so I do not know how much it increased, but reports online indicate about 20psi of increase in pressure.
Exhaust Gas Recirculation (EGR):
One of the issues that constantly came up in our research of Powerstroke 6.0L issues was carbon fouling of the EGR valve and intake. The exhaust system of the van engine sends some amount of exhaust gas back into the intake under some conditions via a cooled exhaust pipe, and metered by a valve. This is done to lower combustion temperatures under certain conditions.
From reading reports of fleet vehicles that idle excessively (ambulances, utility trucks, etc), it appeared that it was possible for the intake and EGR valve to fill up with carbon deposits, with problematic issues beginning to show up around 40-50k miles. Since we were approaching this mileage, and we have idled once in a while to do some battery charging when winter socks us in, we decided to dive in to pull the EGR valve for assessment and cleaning.
When pulled the valve had quite a bit of carbon build up, but did not appear to have enough to cause operational issues yet. The intake had a constant coating of carbon throughout, but not of measurable thickness yet.
Transmission
Cooling:
The transmission is a Ford Torqshift 5R110, a 6 speed automatic that is the same as used in most of the same era F350 and F250 trucks. These trucks are often used to haul very heavy trailers without transmission temperature issues, however a number of folks with 6.0L vans have experienced transmission heat issues as evidenced by a posts in online forums.
There are likely a few contributory causes, but the most relevant is probably due to the tiny van transmission cooler. The transmission cooler in the van is 12x6" in dimension, the grill area available above the bumper is 29x12", and a truck running the same transmission has a cooler of 17x23" (5.5x as big) (thickness unknown).
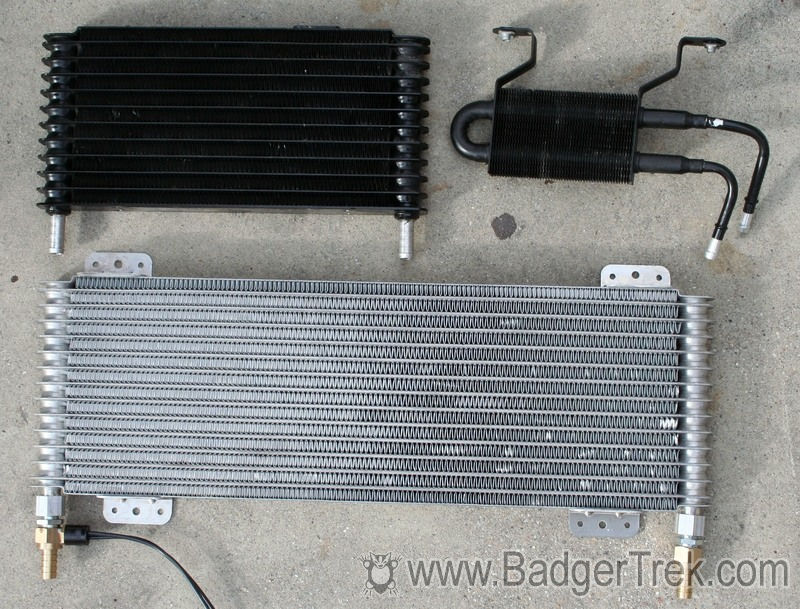
Top left is the old transmission cooler (now steering cooler), top right is the old steering cooler, and bottom is the new transmission cooler with fittings and thermal fan switch.
Additionally, with the way that we use the van, it is always loaded near the GVW, and is often driven very slowly offroad, when the torque converter will not be locked (creating heat) and the airflow over the cooler is minimal.
To improve cooling we chose to replace the small stock cooler with a "Tru-Cool Max" transmission cooler with a thermally activated fan over the hot end to add some cooling when we are driving very slowly offroad.
Prior to installation I did a test drive with our new transmission temperature readout, finding the transmission temperature hitting about 205 on an uphill grade on a 20deg F day. After installing the new cooler (without the electric fan installed) the temperature on the same hill hit 170 and stayed there on a 35deg day. I believe 170 is the fully-open temperature of the transmission thermostat, as the entire rest of the drive the transmission sat at 164-170 deg regardless of load.
Filtering:
The stock setup has a filter screen inside the transmission pan, and an external bypass filter that takes about 10% of the transmission fluid flow.
As a transmission is full of clutch plates to generate the clamping forces that engage the various gear ratios, the fluid is continually contaminated with the abrasive particles that the clutch plates are constructed out of.
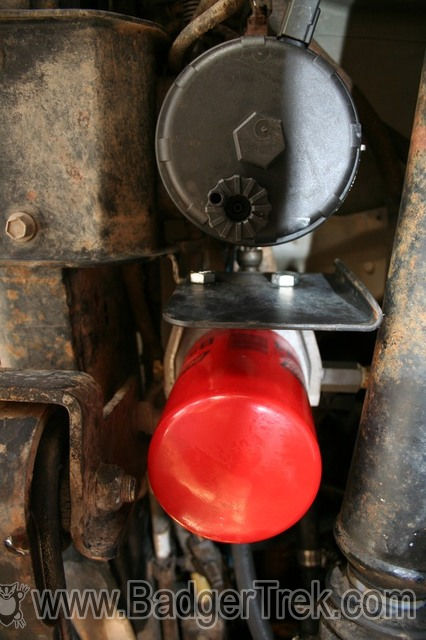
There are a number of aftermarket transmission filter setups available for this transmission. we selected one from dieselsite.com because it offered a pressure gauge to monitor filter state, filtered the full transmission fluid flow once the transmission is up to temperature, offered a simple drain & flush valve, and had a pressure bypass incase the filter became clogged.
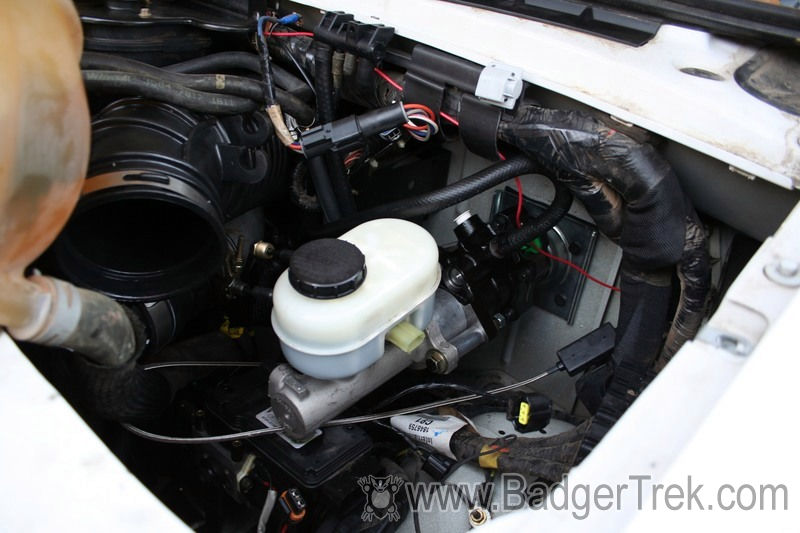
| As you can see by the install picture to the right, our mounting location appears somewhat unfortunate as it will result in the oil in the filter gushing out when changed. What isn't visible is the drain valve on the far side of the filter header, that will allow us to drain the filter prior to changing. There will be some mess, but this should help, and it keeps the filter and lines out of areas of potential snagging by rocks and branches under the van. | 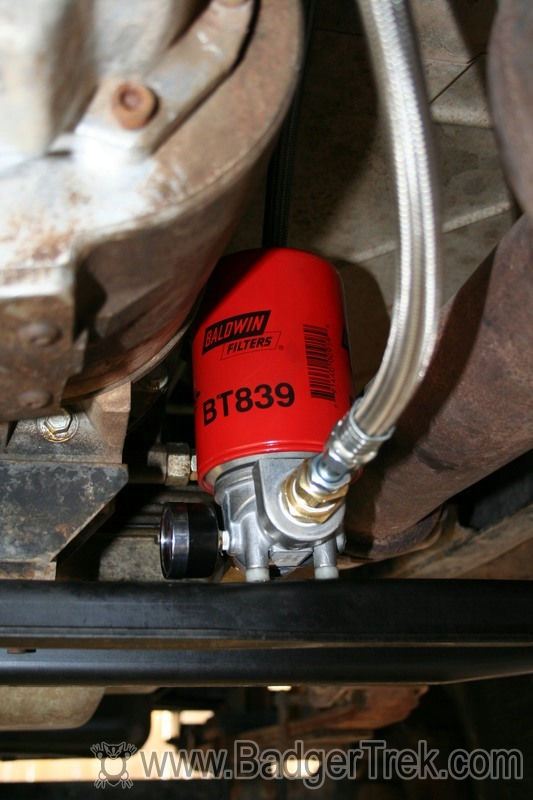 |
Brakes:
We have found the brakes on the van perfectly fine for highway use, even with the large 37" tires we have run recently. They do, however, require an extraordinary amount of pedal pressure when descending ledges offroad. When both front and rear are dropping off a 1+' ledge at the same time it is nearly impossible to halt the descent with the stock brake system.
Both front and rear are disk brakes, and share the rotors and calipers with the F350 series trucks from the early 00's, which often haul very heavy trailers and have no reputation I could find for problems stopping. The big difference is that the brakes on the F350s are hydroboosted, while the vans use a standard vacuum booster (with a vacuum pump running off the belt). Additionally the E450 vans used in larger RVs and ambulances use a hydroboost brake system.
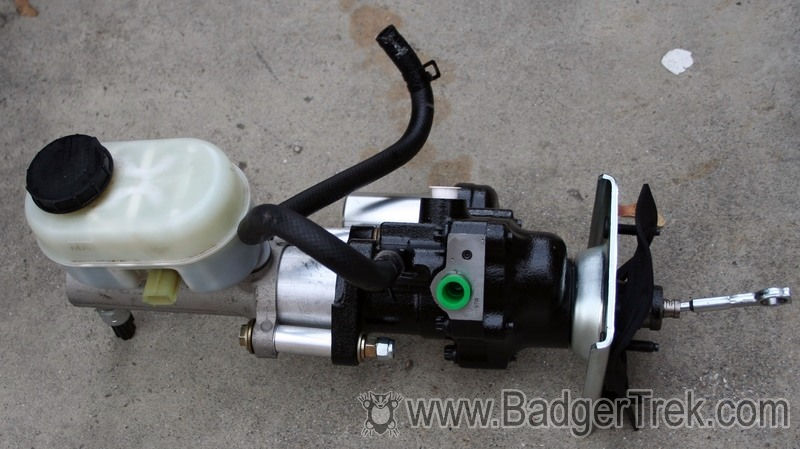
There are some aftermarket brake setups available, using larger rotors, harsher pads, and so on, but they are very expensive (thousands of $). We decided to start out by retrofitting an E450 hydroboost unit to our van to see how a change here would affect things. The E450 hydroboost (and the F350 truck) use a 1.56" diameter power piston. The stock vacuum booster is a dual diaphragm with effective diameter of 13.46" (data obtained from Ford body-builders' handbooks for each).
Initial measurement of brake-line pressure showed about a 20-15 fold pressure multiple from pedal to brake fluid @4500' elevation (10lbs of pedal pressure gives 200psi at brake lines, while with 100lbs of pressure on the bake pedal, the brake-lines are at 1500psi). With this data in place we swapped the vacuum booster for a new E450 hydroboost unit (paid 175$, and probably 100$ for all the new hydraulic plumbing and adapters I machined to match the stock master-cylinder of 1.125"dia).
After putting in the hydroboost system the brake-line pressure was a steady 20+ fold multiple of the pedal pressure (so about the same at low pedal pressure, and 33% higher at high pedal pressure). Quick presses of the brake pedal reacted with much higher multiples, although measuring this was not feasible, it spiked my brake-line pressure gauge at over 2000psi with only my hand pressure.
The improvement in braking is not extreme, but is definitely noticeable, and the limitation in street braking is the uncomfortableness of being thrown against the seat-belt. It also takes less foot pressure to hold the van still when in low-drive. Considering our tires are about 33% larger in diameter than the stock van tires, braking should be comparable to a stock E350 at full weight.
Theoretical hydroboost brake boost maximum (rough, not accounting for input rod displacement, atmospheric pressure differences, etc):
Hydroboost piston area: (1.56/2)^2 * 3.14 = 1.91 sqin
PS Pump assume 1400psi
= 2674 lbs on master cylinder pushrod
2674 psi / 1 sqin = 2674 psi in the brake lines (1 1/8" master cylinder)
Vacuum brake boost maximum:
Boost area: (13.46/2)^2 * 3.14 = 142 sqin
Boost pressure (best possible @ sea-level with perfect vacuum pump) = 14psi
= 1988 lbs on master cylinder pushrod
1988 psi / 1 sqin = 1988 psi in the brake lines
2674/1988 = 1.34
Which is just about the ratio I measured at lower pedal pressures. Of additional benefit is that hydroboost will not diminish with altitude, and I can get a somewhat higher pressure aftermarket power-steering pump to get greater boost (I believe some hydroboosts have a set high-pressure blow-off of around 1600psi on the hydraulic line, unsure of ours). Additionally foot pressure multiplied by the lever ratio of the brake pedal is added to the numbers above, so max brakeline pressure is probably about 4-500 psi higher when really stomping on the pedal, though this addition is identical for either type of booster.
Steering:
The large tires we run on the van, coupled with the slow speed at which we drive when putting the greatest strain on the steering box, pretty much guaranteed we would be over-working the power-steering fluid. When we added the hydroboost brake system we added yet another load on the fluid, and the van has a very small fluid reservoir (less than 2 quarts are total in the whole stock system), and a tiny power-steering-fluid cooler.
When the system was drained to install the Hydroboost system for the brakes, the drained fluid was already beginning to smell a bit singed. Since this work was done at the same time as the transmission cooler was replaced, we had a source for a much larger cooler (the old transmission cooler) for use in the steering system.
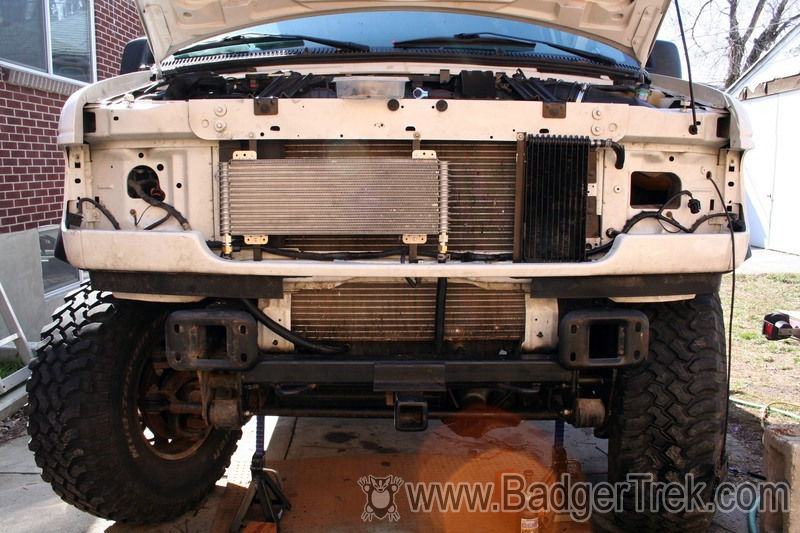
New transmission cooler on passenger side, new steering cooler on right (old transmission cooler)
After installation the steering fluid was sitting at about 80 deg F on a 50 deg day following a half-hour drive around town with a lot of steering and stopping. Unfortunately I did not gather information on how hot it got in similar conditions prior to this change, but the old fluid was definitely burnt.
Engine Heat Venting:
The engine in the van is packed in with very little space around it, leading to a very hot engine compartment with a lack of airflow through the radiators (due to high pressure in the engine bay). I believe this is one of the reasons that the van engine is de-rated relative to the same engine in the Ford pickup trucks. Additionally, with our large front bumper, the bottom 1/3 of the radiator stack gets nearly no airflow.
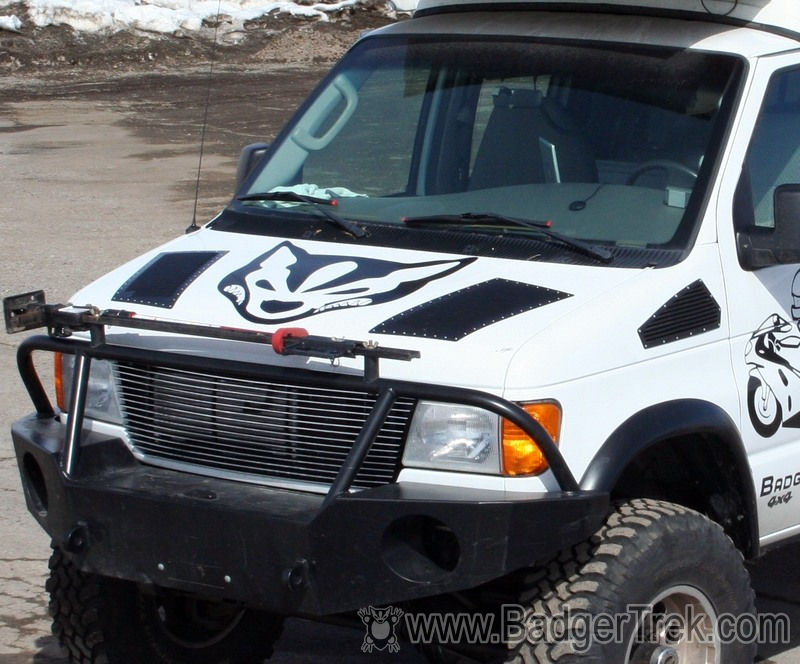
The first change was to remove the stock grill which did not seem to serve much purpose considering the huge holes in some places, and the large emblem and bars in other places. This was replaced with a moderately-sparse metal grill. The inner grill bracing was largely not needed with our new radiator setup, so this was cut away to allow more un-restricted airflow.
In an attempt to give hot air some more escape paths from the engine compartment, leading to a cooler engine bay and easier airflow through the exposed radiator stack, we added a couple sets of louvers to the van. One set we added were on the hood, as near the edges (lower pressure at speed) of the hood as possible without compromising the structure of the hood. The second set we added were "cheek" vents on the sides of the front quarter-panels in front of the doors. Some holes from the engine compartment into the area thus vented already exist, and we added a few more with some hole-saws.
When the engine is warmed up and we stop one can feel hot air gushing out of all of the vents, so it certainly is evacuating heat. Additionally the exhaust gas temperature has dropped a bit for the same conditions, likely because there is more cold air-flow over the intercooler.