www.BadgerTrek.comAbout/ContactWeb LogOur Camper Van
Resources:Hobbies:MotorcyclesAmy's CakesOutboard Hydroplane RacingRadio Controlled Toys |
Sportsmobile Appliances: (furnace, stove, fridge, coolant/water heater)
How it came:
For our basic appliances we had the van outfitted at Sportsmobile with an Espar diesel powered Airtronic furnace and an Espar Hydronic coolant heater that has the coolant run through a heat-exchanger for the potable water system as well. For cooking we installed a Wallas Diesel cooktop we purchased from a boat supply house. The toilet is a Thetford electric Porta-Potty provided by Sportsmobile.
So far the diesel powered appliances have all operated well at up to 10000' elevation, even though they only seem to document operation at lower elevations (especially the stove). Above 10000' we begin to have issues with the furnace and the cooktop wherein they will flame out at low heat settings. They do restart after being turned off for a few minutes and run at higher output settings though, so this is not a very big deal.
Furnace:
The cabin heat is provided by an Espar Airtronic Diesel powered heater. It produces plenty of heat to keep us warm and toasty even down to the negative single digits F (which is as cold as we have been so far). Fuel consumption is negligible and it does not produce very much noise at any but the highest setting.
The unit is located under our sofa just behind the driver's seat, with a short output duct to the front of the sofa facing the main isle. The controller for the furnace is located on the headliner above the sofa along with a selection switch to choose from a low (0-5000') and high altitude (5000'+) fuel pumps. The fuel pumps themselves were located near the fuel tank filler bolted to the skin of the van just inside the rocker panel on the driver's side.
Issues: There was no insulation behind the furnace thermostat, so the thermostat would stay cold even when the interior heated up significantly, causing some very significant temperature swings inside the cabin when the furnace was needed.
The Fuel pumps for the furnace were bolted with self-tapping screws to the van body, resulting in an amplification of their "clicking" noise into the cabin when running.
Changes: Insulation was placed in the gap behind the sofa side headliner so that the thermostat would react more reasonably to interior temperatures (it worked well, though I am unsure of why: Espar literature us unclear as to the location of the current temperature input (in the dial, or the air-intake to the burner), so the other insulating tasks done at the same time may have impacted this as well).
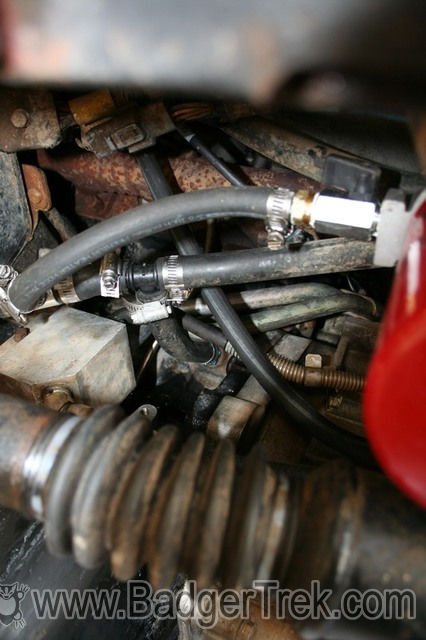
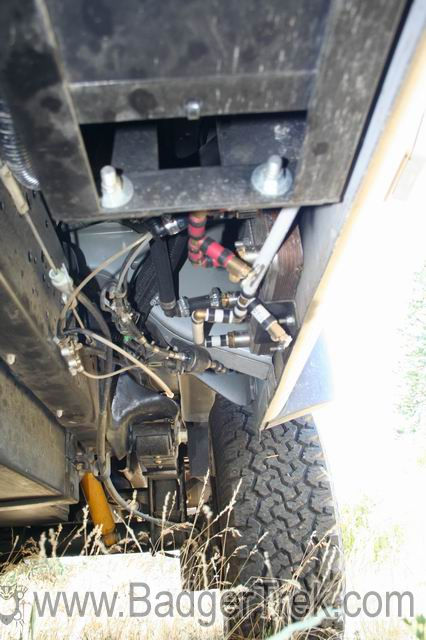
Fuel pumps & lines were moved into the cup of the frame-rail between the frame rail and the fuel tank. Lines and pumps are now protected from debris, and the pumps are barely audible outside the van, and not-at-all inside the van.
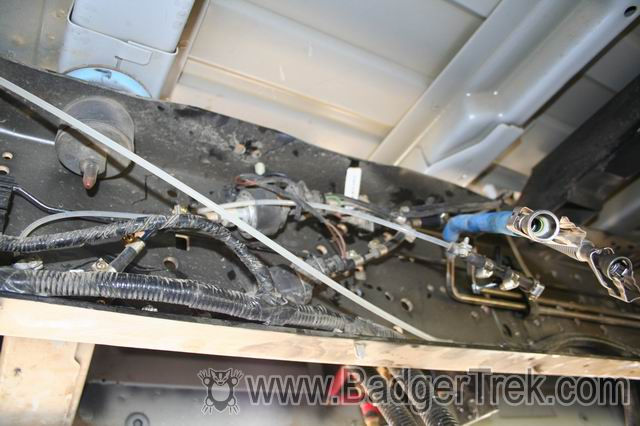
View of the left frame rail from the center of the van (where the tank normally is. The blue & black hoses are the fuel pickup and return lines for the engine. The white lines are fuel line for the accessories, and the cylinders with wires and hoses are the furnace fuel pumps.
In mid 2006 Sportsmobile sent us a temperature probe for the furnace so the heater could sense the temperature in the cabin directly. (It normally senses the temperature based on the air coming into the furnace itself). I installed the probe, but could not really tell how it worked till the temperature cooled. It did change the behavior in that the furnace no longer always ran the fan even when not heating. Once the weather cooled we found that with the probe plugged in the van temperature would have to drop about 12 degrees before the furnace would run. It would then heat the cabin about 12 degrees before shutting off. With the probe disconnected the variation was only about 3 degrees. Needless to say we leave it unplugged now. This appears to be an Espar issue and I will try to contact them.
Coolant Heater:
Sportsmobile installed an Espar Hydronic Coolant Heater. The coolant heater is used to pre-heat the engine coolant when the vehicle is in very cold conditions and needs heat to help start. The heated coolant is also piped through a heat-exchanger for the hot-water side of the potable water system. Unlike the furnace there is only one fuel pump, and it is integrated into the body of the coolant heater itself.
Issues:
The controller for the coolant heater is located on the headliner behind the sofa, at a height that my head tends to bump the "ON" button, which I use to notice from the diesel fumes that would draft inside as it fired up, but now I need to really listen for it since the cabin has been sealed up significantly.
The plumbing for the heat-exchanger, and the heat-exchanger itself were mounted under the van inside the driver's side rocker panel. This put the pipes at great risk of damage and freezing.
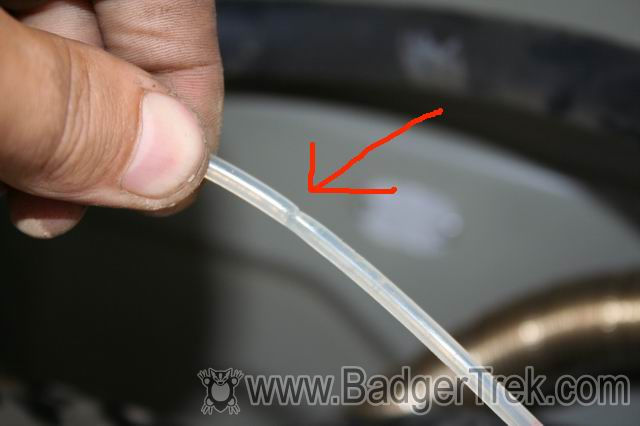
The fuel line to coolant heater was pinched by a chunk of sharp angle-aluminum used to keep it out of the way of the house-battery. When I got to it the fuel line wall was cut about 1/2 of the way through, and probably would have begun leaking very soon.
As delivered, after running the coolant heater for an hour, the engine should be fairly warm. Feeling the block would reveal it to still be cold, though the radiator top and other coolant pipes that are outside the thermostat-closed circuit were hot to the touch. When the engine was started (not noticeably easier in the cold) the temperature gauge initially read about 1/3, but quickly dropped to 0. This made me suspect that the coolant heater was not plumbed in the most optimal way. Some investigation here of the hose routing explained the unimpressive performance. With some poking around I could see that the hydronic inlet was plumbed to the inlet of the heater-core, and the outlet of the hydronic was plumbed to the outlet of the heater-core.
A quick look at the van's coolant schematic (in the Ford "coffee-table" book on the 6.0L engine) shows that the only paths the heated coolant would take were either through the heater core (potentially making the cabin of the van warm, but not heating the engine-block), or through the water-pump housing (again not heating the engine block) which could begin to open the thermostat, dumping heat to the radiator as we experienced. There was no reason for any of the warmed coolant to flow through the engine block at all.
When the engine was started up the temperature sensor would read the hot coolant by the water-pump, but a moment later all the cold coolant in the block would be pumped through and the real (cold) state of engine temperature would be reflected by the gauge dropping to 0.
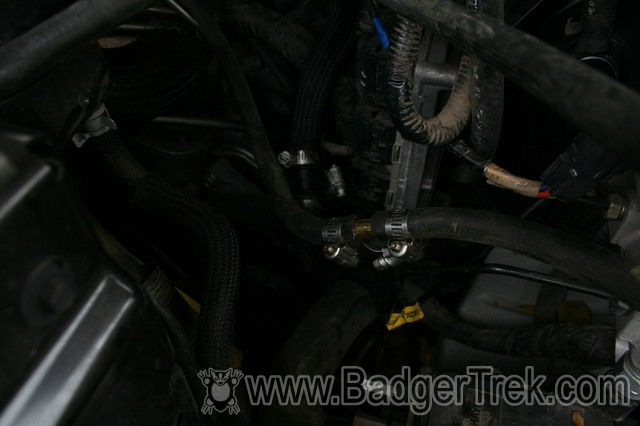
Additionally the coolant hoses that Sportsmobile used to plumb in the heater ran over the top of the front engine compartment, placing them in the way of accessing or working on anything in the compartment. During our travels we finally tracked a persistent coolant leak down to one of the splices in these hoses as they had an excessive number of Ys and Ls spliced into the cooling circuit. These Ys were severely under-sized with a 3/8" hole while the Ford plumbing they interface with is all 3/4".
Finally, after 13 years, I noticed a coolant drip under the coolant heater when parked. Wiggling the hose connections to figure out the source (assuming it was a loose hose-clamp) resulted in the inlet nipple coming completely off, dumping coolant all over me. The inlet nipple on the coolant-pump built into the hydronic had broken clean off. A replacement pump housing showed that the mold had been changed to make the transition between the nipple and the pump body smoother.
Changes:
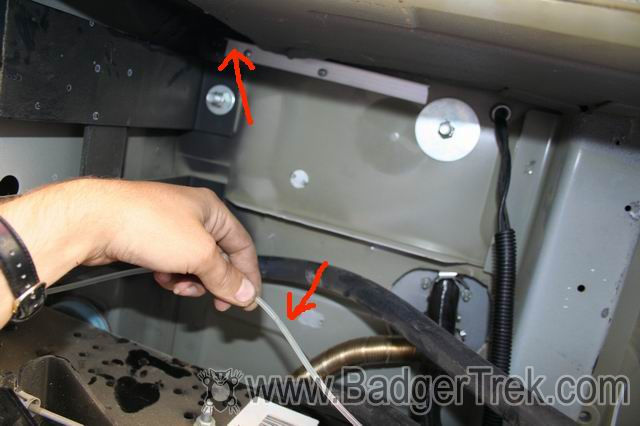
I re-routed the fuel line when moving the furnace fuel-pumps to keep the line shorter and better protected inside the frame rail.
As part of our re-build in 2009 I tore into the engine compartment with the goal of changing how the coolant heater was plumbed in, to make it more effective.
I did some extensive changes to force the heated coolant to flow through the block and actually pre-heat the engine. I first removed all the Sportsmobile routed hoses and restored the heater-core feed and drain lines (using 3/4" splices with a 5/8" hole instead of the 3/8" hole in the Sportsmobile supplied junctions and Ys).
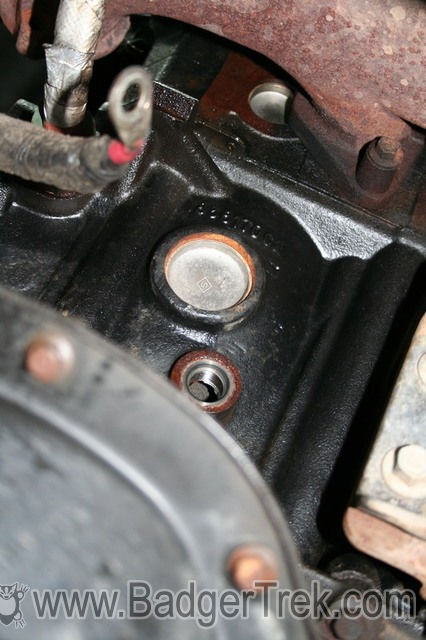
I pulled coolant to the Hydronic from the block drains at the rear bottom of each side with some hose-nipples I machined to fit the drain plug holes (16x1.5mm). The line coming from the passenger side required a tight molded L hose to clear the starter motor and then routes between the oil-pan and frame cross-member to a Y at the driver's side block-drain, and finally continues on to the Hydronic.
The heated coolant coming out of the Hydronic (after the potable-water heat-exchanger) was routed to the heater-return at the water-pump housing on the front of the engine (under the air-intake next to the steering column).
All of these routing changes resulted in about 6' less hose used, and all Ys were replaced with 3/4" Ys (5/8 hole, vs the 3/8 hole of the Ys from Sportsmobile). There are also no longer any non-stock coolant hoses running across the engine compartment.
When this was all plumbed in (along with the coolant filter I installed at the same time), I re-filled the cooling system and did a test on a sub-freezing morning: After running the Hydronic for 1 hour the thermostat registered 164deg (1/3 on the stock gauge). I started the engine (started very quickly for a cold morning), and the temperature slowly dropped to 155deg (1/4 on stock gauge) over the next minute before beginning to climb again.
Cooktop:
For cooking Sportsmobile offered no diesel fueled options, so we added a Wallas diesel cooktop/heater that we obtained from a local marine supply house after picking up the van. It was expensive, but, in addition to providing a cook stove, it can serve as a backup furnace in case the Airtronic suffers a failure. Unlike a propane unit, all combustion products are vented externally, so the stove does not contribute to CO, CO2, or H2O in the cabin air, and thus we need not open a window to vent fumes when cooking (very nice when it is very cold outside).
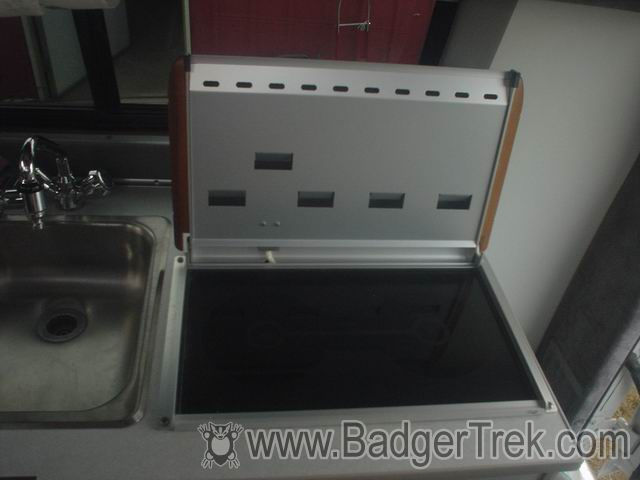
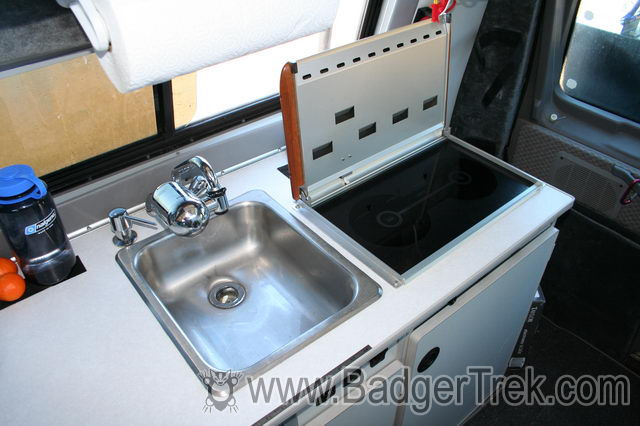
How It Came: We had specified a cabinet of the right width with nothing on the counter or above in our floor-plan layout for the van.
Changes: Installed the Wallas 125DU Diesel Ceramic Cooktop (available from ScanMarine in Seattle) with heater lid (this allows the cook-top to be used as a cabin heater as well). It works well, and is a very nice looking piece of machinery. It did require judicious application of silicone rubber in a few places on the lid to keep it from rattling incessantly during driving however.

After about a year of use it began to emit smoke inside when used at high output for an extended period of time (cooking rice, baking, etc). Initially we tried to resolve this issue by re-sealing the burn box with high-temperature silicone rubber in areas that the silicone originally used had cracked and burned through from the heat. This helped, but did not completely resolve the problem.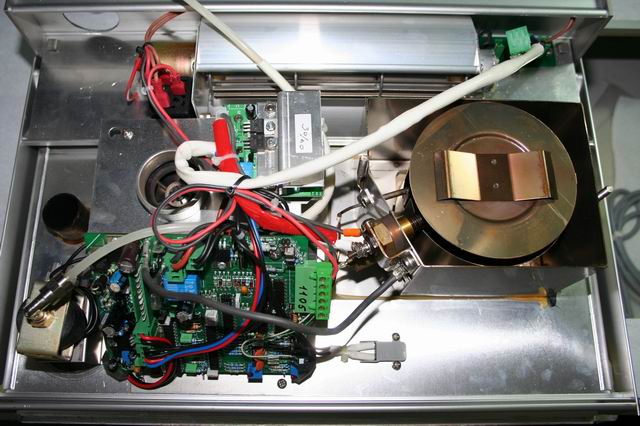
After a few sessions of examining the stove while it was smoking, and finally having issues with the stove not igniting well, we identified the problem as being in the burn-chamber itself where a woven fiberglass mat accepts the injected fuel, spreads it out through capillary action, and hosts the flame. After extended time at high elevations the mat had become caked in carbon deposits, and was no longer wicking the diesel around, resulting in un-burned fuel dripping to the bottom of the stove (which is not sealed) and evaporating from the heat into the cabin. We replaced the burn mat with one made out of fiberglass cloth we found at an auto store and everything worked well again.
Eventually we ordered a few official Wallas mats and found them to be very similar to dense 20oz fiberglass cloth. We now carry a few bits of plain woven 20oz fiberglass cloth as spares incase we again have these issues.
After about 3 years of use the combustion chamber fan motor began to rattle significantly as the bearings gave out. This resulted in an overly rich burn and faster clogging of the combustion chamber. A replacement motor was 40$ from Scanmarine, and turned out to be nothing more than a 4$ Mabuchi RF-500TB-12560 can motor. We picked up a few extras from an electronics supply house.
The stove was clearly designed for operation at sea-level and thus the mixture was almost always going to be too rich for where we are. The follow-on model of stove has accommodation for a switch to run at higher altitude, but that is a significant investment. A bit of investigation revealed that one of the potentiometers (R13) on our stove control board was the mixture control, adjusting the periodicity of the fuel pump strokes. As set from the factory it was 69k ohms and yielded 44 pump strokes per minute at full, while 87k yielded a 5000ft friendly 38 stokes per minute. We removed the potentiometer and replaced it with a fixed 70k resistor plus a dial potentiometer calibrated to altitude settings where we dial in altitude before firing up the stove.
Refrigerator:
The refrigerator is a 3 cubic foot unit made by Norcold (Thetford). It looks nice, and is plenty large for us. It is located on the passenger side about 1/2 way down the van center isle, just across from the sofa (which prevents the door from fully opening).
Issues: The refrigerator made all sorts of buzzing and rumbling sounds and ran a LOT (over 50% of the time on a fairly warm setting of between "2" and "3" on the dial) at normal interior room temperature.
What We Changed: To quiet the buzzing of the fridge we removed it from its cabinet and put silicone caulking along each of the edges where sheet-metal is screwed together to stop the pieces from buzzing against one another. This helped tremendously.
Initially the refrigerator (at a setting of "3") ran about 4.75 minutes and would then sit about 4.5 minutes (at 70 deg ambient). First we added some ventilation holes to the cabinet under the 'fridge to increase air-flow over the condenser coils (4.3min run, 4.8min sit). Finally we added 1/2" of foam insulation to the sides (the holding cabinet was 1" wider than the fridge), 1" under the fridge (with the vent holes, the normal under-fridge air channel was unnecessary), and 1/2" on top (2.75min run, 9.25min sit). The duty cycle of the fridge has gone from 50% to about 25%, resulting in half the energy usage, and hopefully twice as long a lifetime. This also made the 'fridge much quieter when running.

Porta-Potty:
The Porta Potty provided by Sportsmobile is a Thetford electric model. The top half is a seat with integrated flush-water reservoir. The bottom half is a sealed container for waste that can be carried into a regular bathroom or outhouse to be dumped.
Issues:
The porta potty had a cabinet specifically sized for it, however on bumpy roads it rattled about making rather alarming noises and sloshing the flush water out of the vent.
The electric flush is powered by 6 AA cell batteries, which last about a month or two of full time use (2 people) before needing changing, which can get expensive and bothersome when you don't have spare batteries around.
After 6 months the flush motor started to weaken, the battery compartment began to fill with water, and soon the whole system stopped working.
What We Changed:
To keep the unit from banging around in the cabinet we put weather-stripping around the perimeter of the top and bottom halves. This damps the banging, and also takes up most of the excess space in the cabinet so the toilet doesn't have time to build momentum when getting jounced around.
We tried to comply with the Thetford warranty procedure to get the toilet repaired, but after 2 months without a toilet we took it back from the repair shop that was waiting for the replacement parts and replaced the motor unit with a bellows that Thetford sells for their manual-flush toilets (fit perfectly). In our experience so far: The manual flush works better, uses less water, and is far less complicated and likely to brake (and we carry a spare bellows). No more battery buying either.
General Issues:
- The accessory fuel pickup runs dry when the tank is about 1/3 full. This means that the last 1/3 of the fuel tank is useless to us.
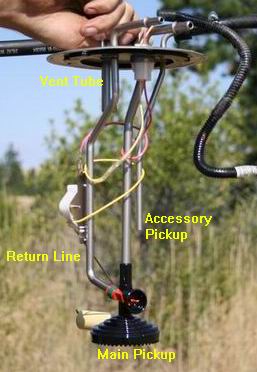
- Filling the last 5-8 gallons in the tank is a slow painful process since the tank vent descends so far into the tank, forcing displaced air back out of the fill hose, which causes the fuel to foam a LOT.
- Accessory fuel pickup has no fuel filter inline or in the fuel tank (discovered when I dropped the tank)
- Furnace fuel pumps, and fuel lines for the furnace and coolant heater were mounted in a very exposed location where debris from the front driver-side wheel could hit them and potentially break open the fuel-lines, siphoning the fuel tank mostly dry in the worst case.
- The gasket holding the fuel pickup assembly to the tank leaked. After dropping and modifying the pickup I sealed it up by properly torquing the nuts that hold it on, but it began leaking again a month later. I need to drop the tank again and seal it with some fuel-proof RTV or something as the metal on the assembly is very thin sheet steel, and I think it is just buckling between the bolts.
Changes:
- Accessory fuel pickup was extended to the bottom of the fuel tank, and a fuel filter was placed on the end so that debris in the tank would not get into the fuel lines or pumps (the tank had some small welding slag rolling around in the bottom).
- Fuel tank vent was trimmed, which allows the last few gallons to go into the tank MUCH faster. There is also a descending vent tube built into the TransferFlow tank which we also trimmed (though getting to this required much pain and suffering (and even a few drops of blood))