www.BadgerTrek.comAbout/ContactWeb LogOur Camper Van
Resources:Hobbies:MotorcyclesAmy's CakesOutboard Hydroplane RacingRadio Controlled Toys |
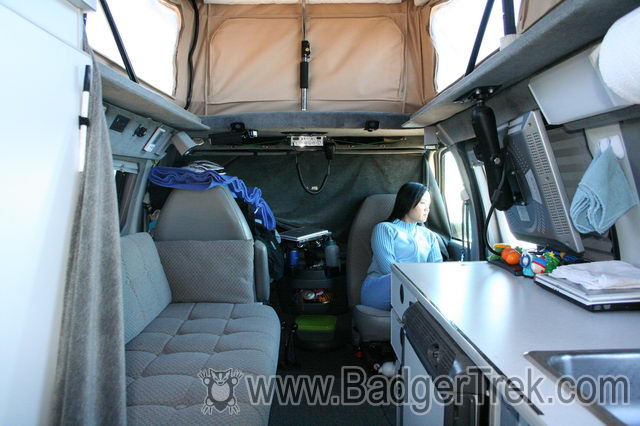
Sportsmobile Interior:
From the front looking back. (I am not permitted to disclose Amy's height, but it is somewhere between 4'10" and 4'11")
How It Came:
Our floor plan is a custom one which we spent many a night agonizing over. This was our second attempt, after Sportsmobile suggested some changes (we had the tall cabinets and short cabinets basically opposite where they are now). They suggested that this would prevent seeing out the rear passenger windows and present a blind-spot, while we had chosen putting the counter near the sofa for less water-line run from the tank & heater to the sink. In retrospect, I would prefer we had stuck with the first plan since we cannot trust what we see out those windows (a Geo Metro would be completely invisible, and the motorcycle blocks much of the window) and have to rely on the mirrors anyway. Now the hot-water takes a quart of wasted water to get the hot water around to the faucet, as well as adding more length where freezing of the pipes is possible.
The swiveling passenger seat is awesome. it effectively adds a couple feet to your living space, and also makes getting in and out of the van much easier from the side door without running into a seat-back. We thought that the driver seat would also be on a swivel, but it came as a powered seat (probably some miscommunication or assumptions on our part, since all the vans we had seen in person had a swivel there). We don't really mind since the power seat lets us adjust it quickly between the two of us, and any swiveling it would have done would still have had easy access to it blocked by the sofa. We use it instead as a stash for coats, boots, and other stuff when we setup camp.
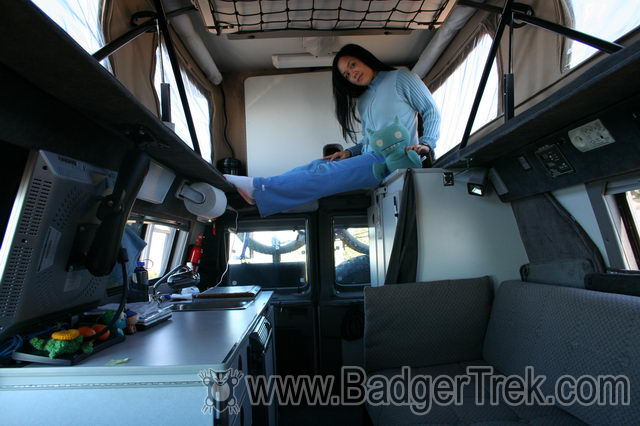
The penthouse-bed is in two pieces, the front 2/3 straps to the ceiling when the roof is up, and the rear 1/3 rests against the fabric at the rear of the penthouse. At night, or when driving, it rests in rails at the van's old roof level. The bed is a wooden frame with a couple inches of fairly dense foam on it. We find it quite comfortable. When the roof must stay down at night (extra cold, windy, snowfall, etc) we can fold-out the sofa and use it as a secondary bed downstairs.
For the floor we had vinyl glued to the plywood floor and a carpet insert which fits but can be pulled out for cleaning. We had requested insulation under the floor but were refused.
Cabinetry
How It Came: We ordered the van with the optional gray interior laminate and cabinet facing.
The interior looks quite nice, the finish on the cabinets is fairly good, and they have a very nice latching mechanism using black plastic slam-latches. The walls are white faced paneling, but provide for no easy access to things behind the paneling like plumbing and wiring. Over time the paneling is pulling away from the cabinetry. The cabinets and walls are held together with L brackets and #10 sheet-metal screws, with no wall-anchors to provide more than 1 or 2 threads of grip in the paneling.
The cabinets are constructed out of Melamine coated MDF which is quite sturdy, though heavy, and does not take well to having screws removed and re-installed (it strips out much quicker than plywood). Water spills on the MDF cause it to swell up, and the swells will NOT go away as it dries up, so spills need immediate mopping up. Areas in the van which see frequent dampness from condensation are resulting in the MDF slowly swelling and becoming quite textured. Over time the vibration and shock from driving is causing the screws, that hold the MDF cabinets together, to pull out, requiring the brackets they hold to be moved and re-installed.
Some of the cabinets are not quite square. This results in over/under doors that collide in some positions, and gaps between a door and the opening it seals. Some of this appears due to wall-to-floor angle brackets that were not installed in some cabinets but were in most of the others. The un-anchored walls slip sideways making the cabinet non-square. Others appear just to not be built or mounted squarely.
The vertical shelving bracket strips that hold the shelf brackets are rather close together in some of the cabinets, resulting in shelves that collapse when the only load is near the back of the self (like a book). This could be easily aleviated by having the strips further apart. Some of the shelves are not usable for the rear 1/3 because of this.
One of the cabinet door slam-latches would not keep the cabinet shut on bumpy roads, and was tracked down to the hole the latch is mounted in being located about 1/4-1/2" further from the edge of the door than the others, leaving only a little bit of the latch tongue to contact the catch (which was spaced out from the wall with washers already, so the problem was known on assembly). Similarly the pantry would not always stay closed as the latch only engaged part-way.
The cabinet under the sink had no provision for shelves, but the space seemed to be large enough for at least one shelf.
The supports for the shelves in the cabinets tend to bounce out on rough roads when a shelf is lightly-loaded
What We Changed: Where possible, we put extra angle brackets on the cabinet walls that were not anchored, to help square them up. We also added another set of washers to the catch of the cabinet that wouldn't stay closed so that the latch had a bit more to grab onto, and adjusted the latch on the pantry to engage fully when closed.
Shelf bracket strips were moved further apart in the cabinets where they were not spaced far enough apart. Now we can stack books at the back of the shelves without the shelves collapsing.
Where L brackets are screwed to the plywood paneling larger holes were drilled and wall anchors were placed to provide strong support for the screws used to hold the wall and cabinetry together.
We installed a set of shelf bracket strips and cut a shelf out of 1/2" plywood for the under-sink cabinet
Once we figured out the shelf heights that we wanted, we put a dab of silicone rubber on each shelf support bracket to hold it in place against the bouncing. This seems to be working, and is easily removable if we need to adjust a shelf.
Pantry
We have found the pantry slide-out cabinet to be very very useful for its space, holding over half of the food we carry with us. It did however have its own share of issues.
How It Came: The Pantry cabinet is only held in by two sliding rails on the same side of the sliding insert. When loaded this places significant sideways load on the rails, and the pantry will wobble alarmingly when pulled out. Opposing rails often have a load limit of about 100lbs, this configuration must be significantly less, and these rails have to deal with bouncy roads. After about a month on the road the latch for the pantry vibrated loose on a dirt road and the pantry slid out, breaking off the rails and sending food and bearings flying about the cabin.
The pantry insert is significantly smaller than the space to the van wall would permit. At places behind the pantry there are 6-8" of dead space that never gets used. At some point we would like to build a new insert to take advantage of this room.
What We Changed: After the failure the broken pantry rails were repaired, and two more sets added so that the insert now sits on 6 rails, 3 per side. This is a very stable configuration, the pantry does NOT wiggle even when filled with canned goods, and if the latch gives way again, allowing it to open while driving nothing should break.
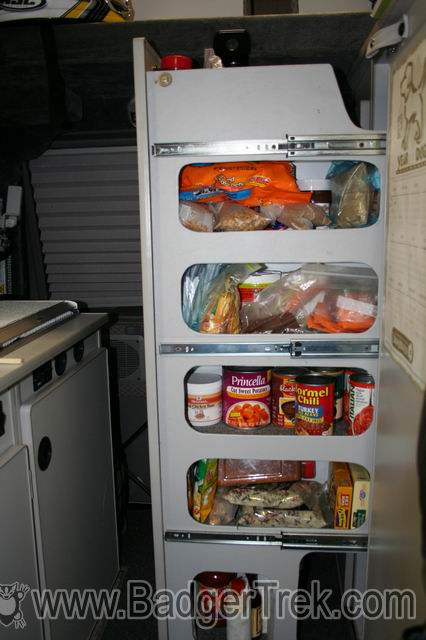
The cabinet walls surrounding the pantry insert were not square to each other, so adding the rails on the opposite side required quite a bit of measuring and a number of washers to space the rails perfectly parallel to the ones on the original side.
Upholstery
How It Came: The upholstery is the grayish diamond fabric chosen because it appeared more durable than the velour upholstery for the seats. The upholstery is on the sofa, the driver & passenger chairs, and the provided sofa pillows.
The upholstery buttons on the sofa began to pop out after about 3 weeks, with the backing nylon disks cracking in pieces and letting the button and string free.
What We Changed: Sportsmobile provided us a new set of upholstery backing disks and strings (which were longer) to alleviate the problems with the buttons popping out. This took a fair bit of time to install, but they are holding up so far. The only problem now is that the buttons are somewhat loose when sitting on the sofa, and will snag on seams or pants pockets.
We treated all of the upholstery with Scotch-Guard since we have a tendency to spill stuff when we least expect.
Curtains/Shades
How It Came: Privacy curtains were supplied which were made out of gray velour, with a black backing on the other side. These buttoned along the windshield and front two windows, another just behind the front seats, and a third strings up in the "hallway" in the rear to provide privacy at the Porta-potty.
We opted for the day/night shades on all of the main living-area windows (all except the wind-shield and driver/passenger windows), and also silvered "arctic-shades" for these windows since we want the added privacy and temperature insulation.
Silvered shades did not come for the front windows & windshield. The privacy curtains as well as the penthouse curtains are gray velour with BLACK on the exterior side, resulting in a lot of heating of the van interior when in the sun. The fabric was also somewhat porous to light at night when seen from outside.
What We Changed: We created silvered "arctic shades" for the windshield and driver & passenger door windows (cloth laminated to headliner foam and "Reflectix" foiled bubble-wrap). These help keep the temperature inside down immensely in the sun compared to the curtains supplied with the van, and keep the van MUCH warmer when it is cold outside.
We replaced all of the penthouse curtains with some insulated multi-layered ones Amy sewed up: 1 sheer layer for privacy with light (great for waking up in the morning sun), and a second curtain made out of a sandwich of laminated white black-out cloth and headliner foam for insulation and temperature retention.
We also added on of these curtains over the front penthouse window which had none (the window is not clear when zipped up, but no way to get privacy when it is zipped down for ventilation). This also helps with insulation abilities. In the rear there is no window, nor a curtain as we usually have the lower 1/3 of the penthouse bed leaned against that section of fabric, which provides some insulation.
Insulation:
When removing the interior walls to address some of the plumbing issues we found that the wall insulation had a fair number of gaps, and cold exterior air could blow in without hindrance in some locations (such as below the window cutouts). More details are on the plumbing page.
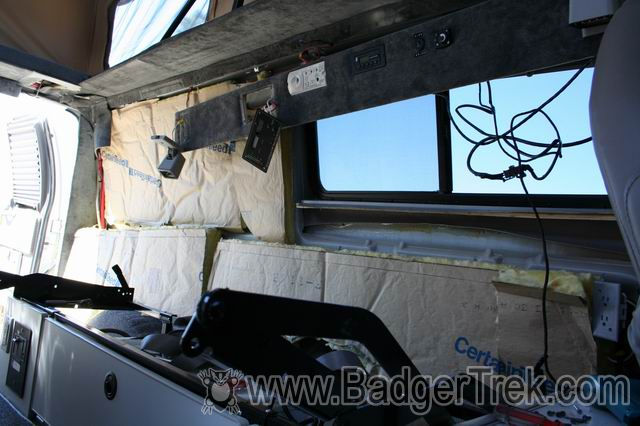
Doors were not insulated at all (discovered when installing after-market speakers for the stereo). This is a fair amount of the exterior surface and we had to address it. In winter the doors fill with condensation making everything in the door cupboards soggy (we lost a few rolls of TP, and all my tools are rusty).
What We Changed: The doors have all had insulation put inside of them to help keep the van temperature stable. The doors with-out retractable windows got fiberglass batting, while the front doors got foiled bubble insulation cemented to the inside surface, out-of-the-way of the window mechanism (we avoided fiberglass here because it can catch in the window mechanism, and will hold any water that comes in with the window when rolled down). The front doors do have a plastic fascia panel with a gap between it and the door-proper, so fiberglass was put here. The fabric lining the door cabinets was glued to the metal skin, so no insulation was put exterior of the cabinets, but this did lead to many soggy items from the cabinets in the winter from condensation (the fabric was drippy wet).
We added fiberglass insulation to the gaps exposed when the walls came out for the plumbing changes. Channels (A & B pillars, bridge over rear door, etc) that were accessible were filled with expanding polyurethane foam. After this work the cabin temperature was noticeably more stable and the interior quieted down a bit as well.
As mentioned above we created new insulated curtains for the windows and penthouse which also noticably improved the interior climate in both sun and cold weather.
We laminated 1/2" of foam insulation pad under the carpet, which is as thick as it could be without interfering with the opening of cabinets. This helps tremendously when its cold outside and we don't want to wear shoes. There is also a notable improvement in cabin temperature consistancy with the foam under the carpet. It also makes it much more comfortable to walk around and stand when not wearing shoes.
Penthouse Top:
The penthouse top was one of the big reasons we chose a Sportsmobile. We were not very keen on the idea of a van with a permanently higher roof due to clearance and storage issues. We intended to carry bicycles and other goodies up top, and a fixed top that provides enough space to stand in would be very difficult to climb up to or clear anything with a bicycle added to it (especially with the 4x4 lift).
With the lift-away bed, electric raising capacity, the flat roof design, and the great ventilation and view provided by the canvas sides with zip-out windows, when expanded, the penthouse offered by Sportsmobile seemed ideal for our needs.
How It Came: The penthouse is raised and lowered electrically, and takes a bit of time to go up and down. It appears that the mechanism was just an adaptation to the manual spring-loaded penthouse mechanism rather than a complete re-design for power. This leaves the roof and all that is held up by it supported by two round steel U tubes that flex a bit when the roof is up and we are near the stated 250lb load limit for things on the roof (this limit is quickly reached with the bed, solar-panels, roof-rack, etc all taking their allotment before you even store anything up there)..
In the time that we have had the van we have found a few issues with the design of the roof mechanism.
- For our van (and apparently not all, based on discussions with other owners), the fabric for the walls is quite taught when the roof is up, putting quite a bit of stress on the ceiling corners which hold the roof and wall fabric together, as well as making the U tubes bend quite a bit as they hit this resistance.
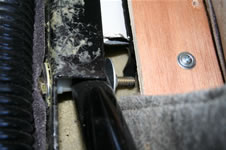
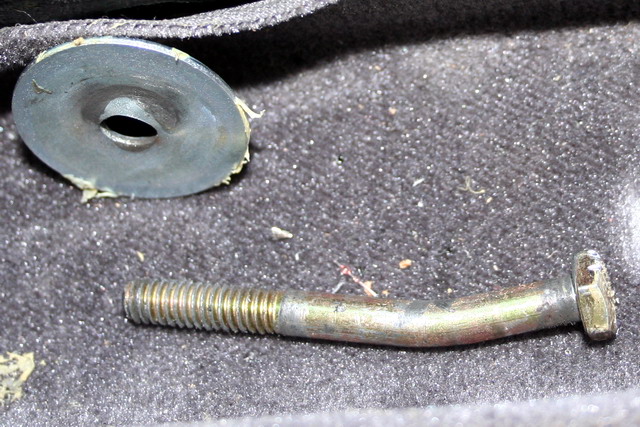
- The rear portion of penthouse roof mechanism suffered a broken bolt on one side, and a bent one on the other just a few months into our trip. This caused a volent bang and dropping of the roof as we were in the process of raising it one fall evening (details at the bottom of the November '05 log).

- In October of '06 I realized we had never checked the bolts at the front of the roof mechanism. I peeled back the upholstry and saw that the bolts in the front were extremely bent and were only supported on one end by a 3/8" hole (they are 1/4" bolts). This explained why the roof seemed to have been creeping forward over the months, with the front latches getting easier and easier to close, and the rear one needing to be loosened every few weeks.
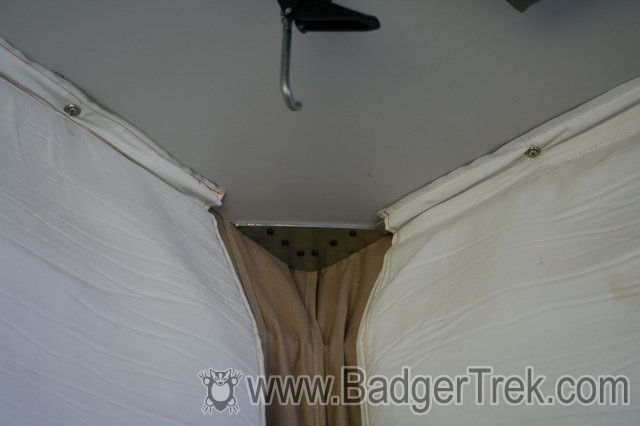
- In colder weather or high humidity the penthouse sides get significant condensation. This is to be expected since it is only canvas and vinyl. Unfortunately the ceiling also gets condensation, especially at the corners, and it is made of plywood paneling. After a few months of winter weather and dampness the plywood is starting to yield to the tension exerted on it by the penthouse wall fabric. At one corner a good 3/4" gap was visable outside between the fiberglass of the roof and the wall fabric, when the roof was raised.
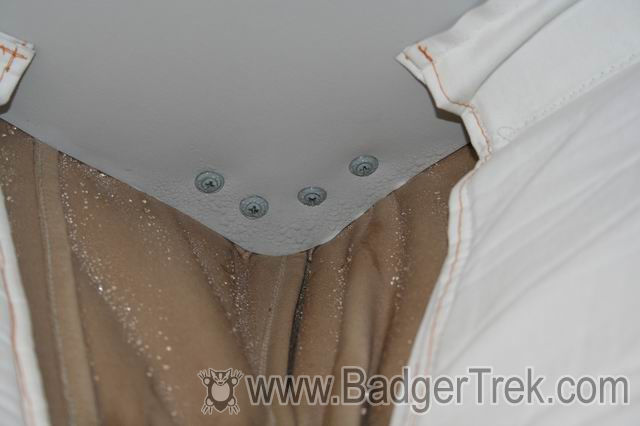
- The screws that hold the ceiling and fabric up are self-tapping screws that were just a bit too long. in a couple corners of the penthouse they have gone all the way through and cracked the outer gel-coat of the roof, letting water in and beginning to rust the screws. Being self-tapping they also don't have threads on the first 1/4" and so do not hold very well. In one corner all 4 of the screws were able to be pulled directly out by hand after 1 year.
- When the exterior temperature gets below 0f the fabric and vinyl windows of the penthouse become very very stiff, even with the inside heated to around 70f. We have concerns about the plastics cracking when flexed at these temperatures due to wind or lowering of the penthouse roof. We currently drop the roof when the temperatures begin to get this cold so that we are not trapped with the roof up and concerned about bringing it down and damaging it.
- The mount points where the penthouse roof clamped when down at the front of the van always had a fair bit of flex to them. This was because they were only mounted in fairly thin plywood, and braced by an arch of about 1/2" plywood which formed the edge of the opening where the roof was cut away. When driving into gusts or past oncoming trucks the whole roof would flex upwards a significant amount. After a year of this the plywood arch snapped in a particularly strong gust making everything that much more flexy.

What We Changed:
- We have made some metal supports for the ceiling material in the corners. They allowed us to use a larger number of screws, spread the load over a larger area, and keep the condensation away from the wood paneling that comprises the ceiling. When the screws were driven in, the gap visible outside between the wall fabric and the roof went from about 1/2" to 0" when the roof was raised.
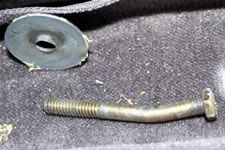
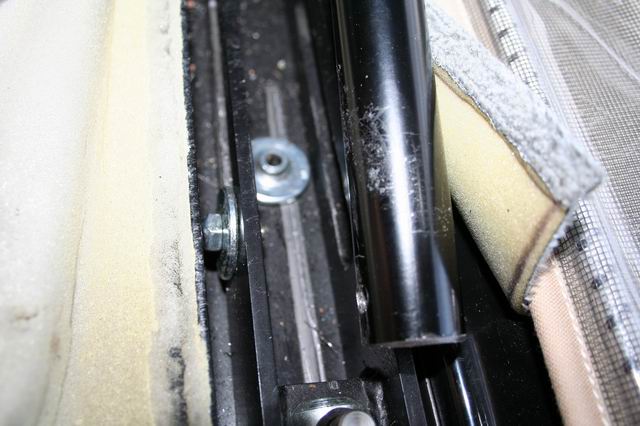
- After the bolt at the end of one U tube (on the motor driven end) snapped, and the other was found to be bent, we switched to longer bolts so the bolt shank would take the sheer loads instead of the threads, and put both conical washers on the inside of the sliding channel to better support the bolt. About 1/4" had to be trimmed from the bolt to fit within the rail, and the conical washers had to be thinned a touch (a few hours by hand with a file... wish a milling machine or lathe had been handy).
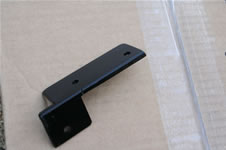
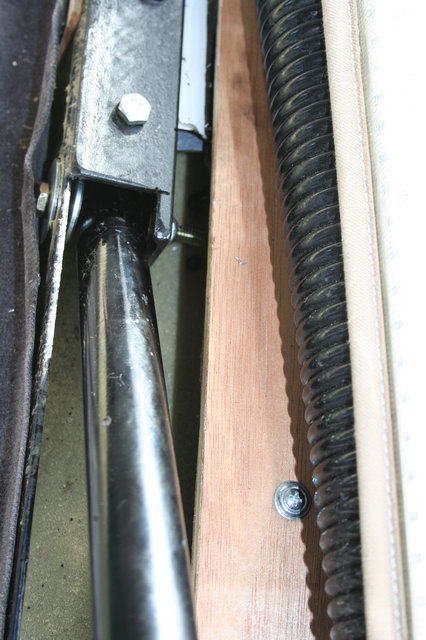
- For the bolts in the front of the U tubes we cut some brackets out of angle iron, bolted them in place, filled the extra large 3/8" hole with a conical washer pressed in, and put new 1/4" grade 8 bolts through everything. This provides much more support, and resulted in the roof raising 1" further than it had been recently. This extra height, unfortunately, causes one of the lifter bars in the middle of the U tubes to pop out of its slot, so we have to watch this when dropping the roof now...
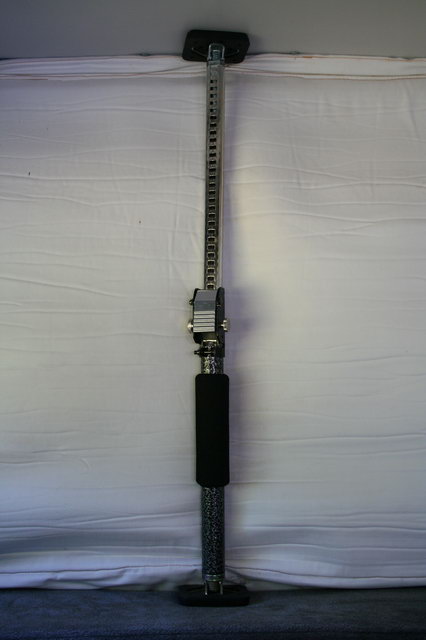
- We converted some "Cargo Load Bars" for use as additional support for the penthouse roof when raised. This keeps it from swaying, and reduces the load on the main U tubes that raise and support the roof normally. With them in place we can hopefully avoid any problems with unexpected snow or wind loads causing failures and dropping the roof on our heads in the middle of the night.
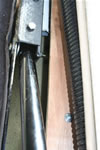
- To stiffen up the front latch points of the penthouse roof we inserted a piece of 2" angle-aluminum that spans the width of the roof opening. The hoops for the penthouse hooks now bolt into this, and the aluminum is bolted to the steel rails that run the length of the penthouse roof opening. With this configuration there is no flex in the roof when we hit wind-gusts, pass trucks, or push up on the ceiling above the driver & passenger seats.

Other Changes:
- Large bungee net on bottom of penthouse bed for holding large light items like window shades, coats, drying wet clothes, etc.

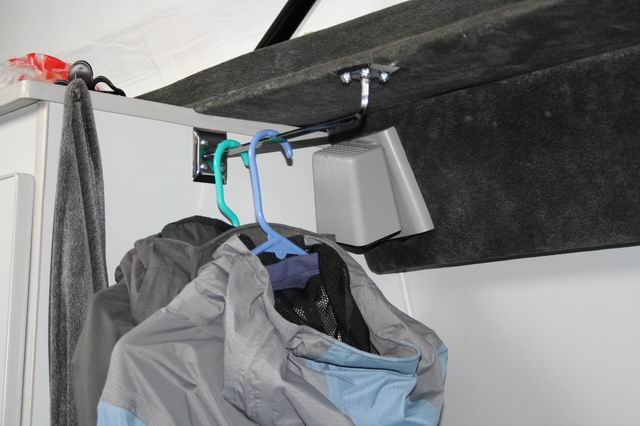
Here you can see the shades (insulated, and sheer), roof supports, and bungee net - 1' coat-hanging rod over back end of the sofa, with hoops on the cabinet wall for bungee cord to hold the coats together against the wall when driving.
- RAM mounts to hold our TFT monitor so that it can be used from the sofa, swiveled passenger seat, or stowed out of the way for more counter space.
- 2" wide "industrial strength" Velcro strips along back of the counter and on various cabinet walls for holding odds and ends. Goes well with Velcro "One Wrap" straps for lashing items to the counter or cabinet walls when driving.
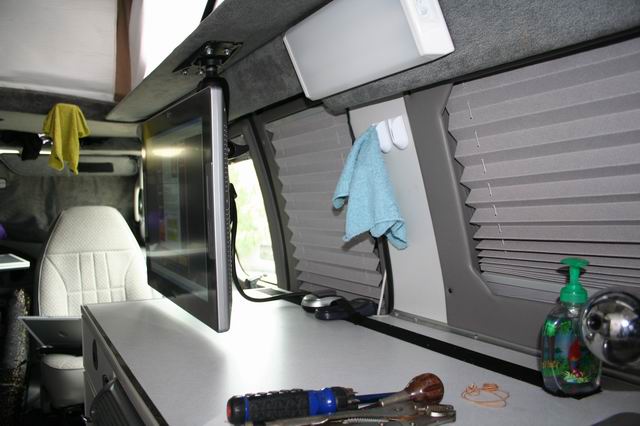
The black strip near the windows is the velcro, and the monitor is shown hanging from the RAM mount, oriented for use from the sofa - RAM mount, arm, & platform with velcro on the "doghouse" between the driver & passenger seats to hold the laptop for navigation. It can be swiveled to be used by either seat, and also places the laptop near the stereo for audio input (music from the computer, driving directions, etc).
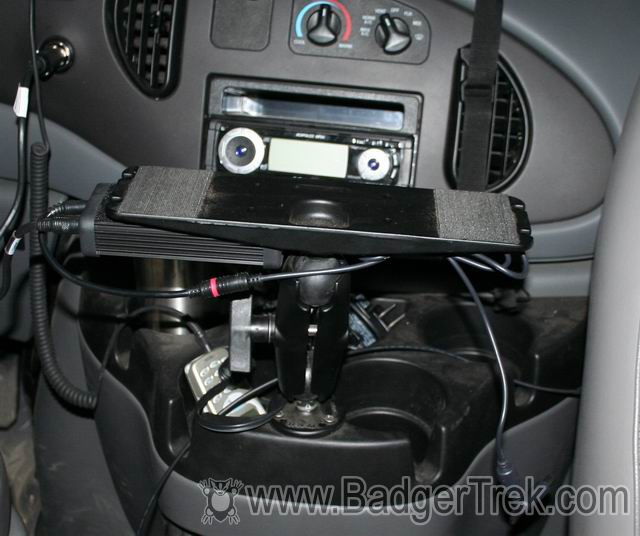
The platform is 3"x11" and fits well with our small laptops. Both laptops have matching velcro on the bottom. The unit under the platform is a DC-DC power supply for the computers. - We also made a few changes to the cabinetry around the refrigerator to improve its efficiency. Details on the appliances page.
Couple photos of the interior from August 05 (before new curtains, RAM mounts, coat hanger, etc):
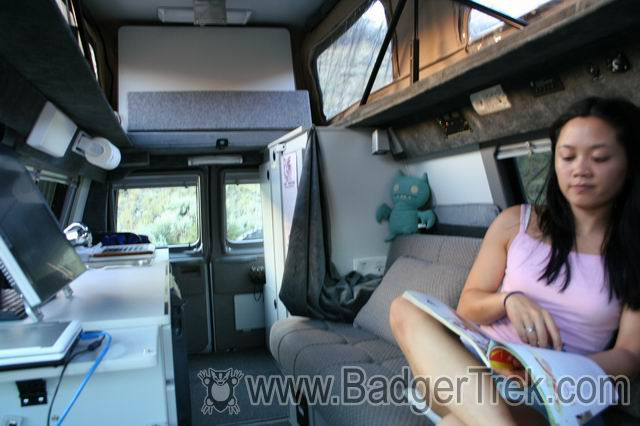
Photo of the current condition (new curtains, RAM mounts, etc):