www.BadgerTrek.comAbout/ContactWeb LogOur Camper Van
Resources:Hobbies:MotorcyclesAmy's CakesOutboard Hydroplane RacingRadio Controlled Toys |
Sportsmobile Plumbing
How it came:
The plumbing in the van was the largest disappointment to us. When ordering the van we had specified that we would be traveling year round, sometimes in cold climates, and would need good insulation and a pre-heater for the engine so that it would start when cold. We were assured that all the plumbing was going to be on the inside of the van, so that the water system would not freeze when the temperature outside was below freezing. The engine coolant pre-heater was an Espar unit that would heat the engine coolant via diesel, and could also route the coolant through a heat-exchanger to heat the potable-water for showers and such.
Upon receiving the van we found that the heat-exchanger for the hot-water system was mounted OUTSIDE the van cabin, underneath, bolted to the skin of the van. It is a metal box, half-full of potable-water, bolted to a huge heat-sink (van skin), that would freeze solid (the potable-water half) if given any chance. The plumbing to and from the heat-exchanger consisted of many feet of plastic (PEX) pipe, also in full exposure to the elements. The location of the piping and exchanger was below the cabin floor, on the driver's side, about mid-ship, where anything thrown up by the front tire could smash into the plumbing. Before winter this would definitely need to be moved up into the cabin for protection from freezing and debris. In a related note, we found that the city-water hookup, which is below the insulated cabin space, near the heat-exchanger, was hooked to the same cold-water line that the heat-exchanger used.
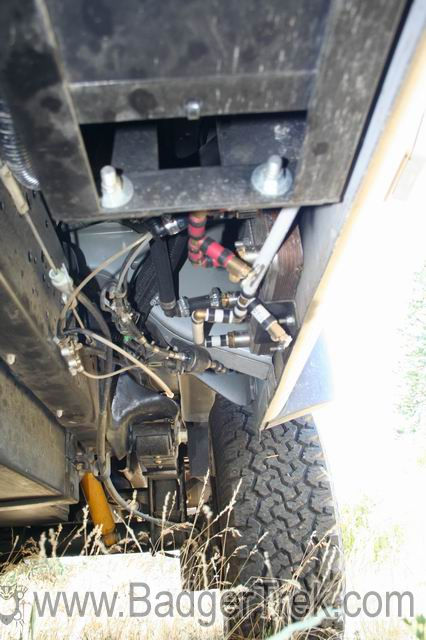
View of heat-exchanger plumbing & fuel pumps for the diesel furnace. under the driver's side of the van. Note lots of exposed plumbing and fuel lines (the thin clear/white tubes)
In a call to Sportsmobile it was admitted that the water system around the heat-exchanger would freeze if the outside temperature was even a bit below freezing for any length of time, but that they had chosen this design so that the heat-exchanger would not heat up the cabin when hot coolant was flowing from the engine (a valve could easily solve this problem, and in fact, when spec'ing the van with SMB we were told a valve would be put in place to choose between heating the engine, or the potable-water heat-exchanger)
In August, when we had time to do the work to move the heat-exchanger we found even more issues with the water lines. Since the heat-exchanger and the plumbing associated with it had to be moved inside, this required pulling out all of the cabinets on the driver side, removing the interior wall paneling, and getting to the interior plumbing. Lo-and-behold, the interior plumbing was mounted OUTSIDE the cabin insulation, so it too would be prone to freezing in cold weather, with little of the benefit of being inside the van. It would have taken little-to-no extra work to insure that the pipes were on the inside of the insulation rather than the exterior, but this was not done :( .
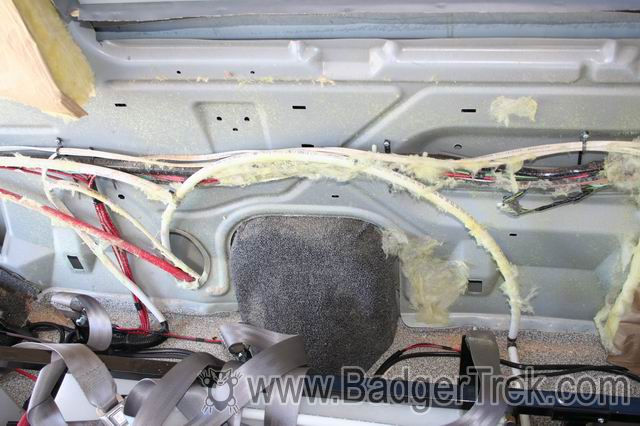
Behind the insulation... Note the hole in the wall that the water pipes head through to the bottom of the van, cold air can come right in here from outside. Also note the gap in the inner van skin under the window at the very top of the photo. Cold air comes in here too (and this is right above the exhaust for the diesel appliances, so the fumes come in here as well).
This view of the van was also educational on the quality of the insulation job. There were significant gaps in the insulation batting, the largest of which was below the slider window. Unfortunately this was also where the inner van wall had been cut overly-large for the van window, leaving a large gap through which outside air could blow up from the bottom of the van, bypassing any insulation, into the interior. This explained why we could almost immediately smell diesel fumes every time we fired up the furnace or coolant-heater (the exhaust for these is directly below this window) even with all windows and doors closed.
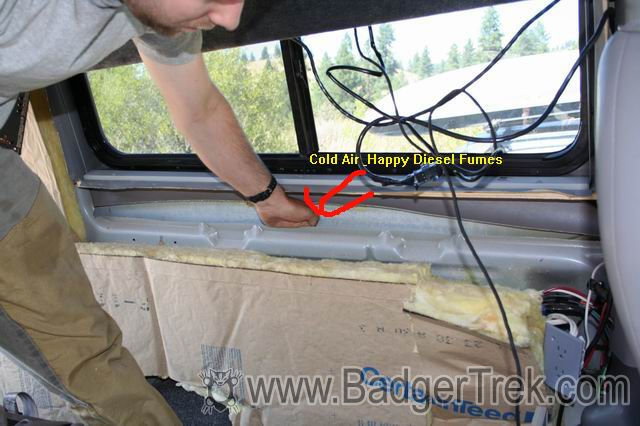
Photo of the area under the window where cold air could come in, no insulation existed, and diesel fumes from the furnace would waft in as well. The inner van skin was cut a few inches larger than the window leading to this gap where my hand is. There was also no insulation above the window, though there was a couple inches of van skin exposed there as well.
What we changed:
First, we obviously had to remove the heat-exchanger from its original location and place it inside under the sofa. This required a lot of work to cut the existing plumbing, remove the coolant hoses, remove the house-battery (HEAVY) for access to the routing of the coolant lines, the prior-mentioned removal of all cabinets and wall inside, and a bunch of measuring, drilling, and re-routing of the heat-exchanger and plumbing lines on the inside of the insulation.
- Added a PUR potable-water filter on the faucet (we will be getting water in various locations, and some water tastes NASTY, even if it is drinkable and filtered with an RV filter when the tank is filled).
- Put in a through-counter hand-soap dispenser by the sink to make it easier to wash hands and not have soap bouncing all about the cabin.
- Installed a Jabsco 1 liter pressure tank in the water system to save the pump and pipes from the hammering they take when the pump is cycled on and off so quickly without a tank. This made the water system MUCH MUCH quieter, often it doesn't even run if you just want a cup of water, and the faucet stopped leaking out of its joints every time the pump pulsed the pressure.
- The heat-exchanger now sits under the sofa, near the water pump. An insulated box has been constructed around it to keep it from passing too much heat to the cabin when the motor is running. With the insulation in place there is no significant increase in temperature under the sofa, even after driving for a couple of hours.
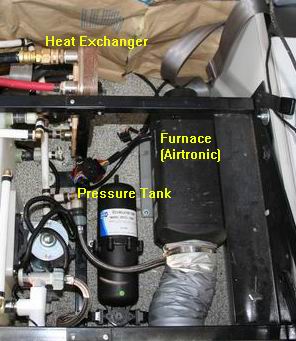
Here is a shot of the pressure tank between the water-pump (left), the furnace (right), and the heat-exchanger (top, minus insulation box).
- The city-water inlet has a 3" insulated run of pipe into the interior from where the hook-up is rather than the 1.5-2' uninsulated run it had previously (if the city-water hookup had just been placed 5" higher, it would have gone right into the insulated & heated cabin for even better safety, and we may do this if we can find a nice panel to cover the hole that was cut in the skin for its current location. We also moved the furnace fuel pumps that were in the same area into the gap between the frame rail and the fuel tank for protection from debris.
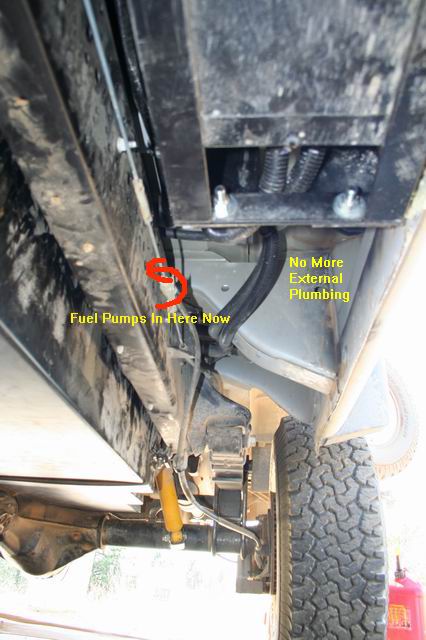
The same view as a ways above, but now uncluttered and less prone to debris. Another benefit of moving the fuel pumps (other than protection), was that they are now on the frame rail instead of the van skin, and they are much quieter. All of this work also made room for a second 4D house battery behind the first one you can see above.
- Plumbing pipes are on the interior of the insulation
- Extra insulation batting has been put in where the gaps were, and the openings that lead directly to the outside air have been sealed with spray urethane foam (i.e. "Great-Stuff")
- The hard plastic line from the water tank to the water pump transmitted a lot of vibration into the water tank and the floor of the van when the pump ran. We replaced this line with a rubber supply line to isolate the pump, letting it rest solely on its rubber vibration mounts. This change noticably reduced the vibration that we feel in the floor or sofa when drawing water.